Spark ML

  • Spark로 머신러닝을 사용해 본다.
  • 실용성과 별개로 경험삼아 작성해보는 코드이다.
  • 머신러닝(ML)은 Scikit-Learn을 중점적으로 공부해야 한다.
  • 딥러닝(DL)은 Tensorflow, Pytorch에 포커스를 맞춰야 한다.

사전준비

  • git bash로 VSCord에 들어가 터밀널을 연다.

바탕화면 우클릭 : git bash here

cd pyspk_project

code .

→ git bash 터미널

pyspark_ml 실습(1)

  • 가상환경 진입하고 폴더, 파일 생성

source venv/Scripts/activate

→ 폴더 생성 : chapter03_ml

cd chapter03_ml

  • 슬랙에서 data.zip 을 다운로드
  • 압축을 풀고 chapter03_ml 폴더에 복사하여 옮긴다.

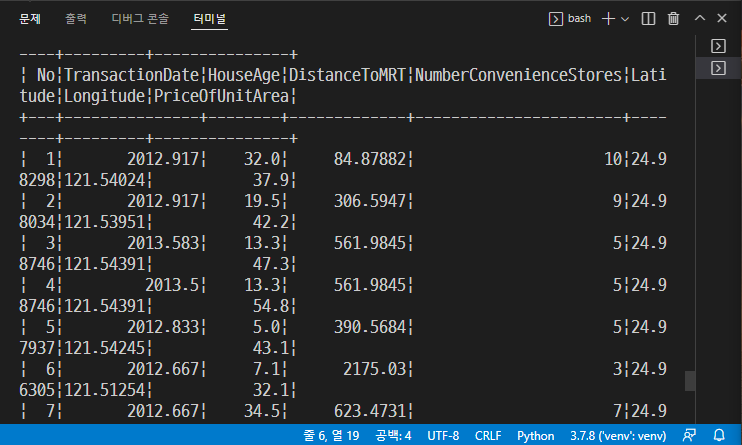
→ 파일 생성 : step01_regression.py

→ 코드 작성

1
2
3
4
5
6
7
8
9
10
11
12
13
14
15
16
17
18
19
20
21
22
23
24
25
26
27
28
29
30
31
32
33
34
35
36
37
38
39
40
41
42
43
44
45
46
47
48
from pyspark.ml.regression import DecisionTreeRegressor
from pyspark.sql import SparkSession
from pyspark.ml.feature import VectorAssembler

# 세션 할당
spark = SparkSession.builder.appName("DecisionTree").getOrCreate()

# 데이터 불러오기
# StructType 이 과정 생략
data = spark.read.option("header", "true").option("inferSchema", "true").csv("data/realestate.csv")

# 데이터 프레임을 행렬로 변환
assembler = VectorAssembler().setInputCols(['HouseAge', 'DistanceToMRT', 'NumberConvenienceStores']).setOutputCol("features")

# 타겟데이터 설정
df = assembler.transform(data).select("PriceofUnitArea", "features")

# 데이터 분리
trainTest = df.randomSplit([0.5, 0.5])
trainingDF = trainTest[0]
testDF = trainTest[1]

# Decision Tree 클래스 정의
dtr = DecisionTreeRegressor().setFeaturesCol("features").setLabelCol("PriceofUnitArea")

# 모델 학습
model = dtr.fit(trainingDF)
print(model)

# 모델 예측
fullPredictions = model.transform(testDF).cache()

# 예측값과 Label을 분리
predictions = fullPredictions.select("prediction").rdd.map(lambda x: x[0])

# 실제데이터
labels = fullPredictions.select("PriceofUnitArea").rdd.map(lambda x: x[0])

# zip
preds_label = predictions.zip(labels).collect()

for prediction in preds_label:
print(prediction)

# print(data.show())

# 세션 종료
spark.stop()

→ 저장 후 실행

python step01_regression.py

→ 다음과 같이 출력된다.

Untitled

pyspark_ml 실습(2)

→ 파일 생성 : step02_logistic_regression.py

→ 코드 작성

1
2
3
4
5
6
7
8
9
10
11
12
13
14
15
16
17
18
19
20
# 세션 할당
from pyspark.sql import SparkSession
from pyspark.ml.classification import LogisticRegression # 기억

spark = SparkSession.builder.appName("AppName").getOrCreate()

# 데이터 불러오기
training = spark.read.format("libsvm").load("data/mllib/sample_libsvm_data.txt")
print("hello")

# 모델 만들기
# Scikit-Learn 문법과 비슷
mlr = LogisticRegression() # 기억
mlr_model = mlr.fit(training) # 기억

# 로지스틱 회귀, 선형 모델.. 기울기와 상수
print("Coefficients: " + str(mlr_model.coefficients))
print("Intercept: " + str(mlr_model.intercept))

spark.stop()

→ 저장 후 실행

python step02_logistic_regression.py

pyspark_ml 실습(3)

  • pyspark_pipeline

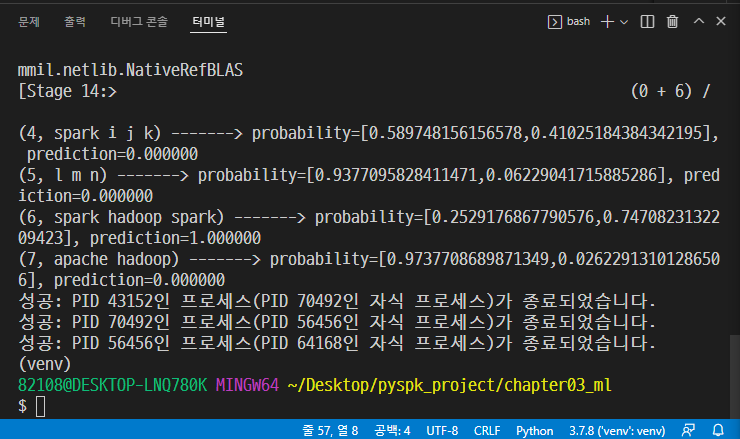
→ 파일 생성 : step03_pipeline.py

→ 코드 작성

1
2
3
4
5
6
7
8
9
10
11
12
13
14
15
16
17
18
19
20
21
22
23
24
25
26
27
28
29
30
31
32
33
34
35
36
37
38
39
40
41
42
43
44
45
46
47
48
49
50
51
52
53
54
55
56
57
58
from tokenize import Token
from pyspark.ml import Pipeline
from pyspark.ml.classification import LogisticRegression
from pyspark.ml.feature import HashingTF, Tokenizer

from pyspark.sql import SparkSession

# 세션 할당
spark = SparkSession.builder.appName("MLPipeline").getOrCreate()

# 가상의 데이터 만들기
training = spark.createDataFrame([
(0, "a b c d e spark", 1.0),
(1, "b d", 0.0),
(2, "spark f g h", 1.0),
(3, "hadoop mapreduce", 0.0)
], ["id", "text", "label"])

# Feature Engineering
# 요리 작업

# 요리준비 1단계 : 텍스트를 단어로 분리
tokenizer = Tokenizer(inputCol='text', outputCol='words')

# 요리준비 2단계 : 변환된 텍스트를 숫자로 변환
hashingTF = HashingTF(inputCol=tokenizer.getOutputCol(), outputCol="features")

# 요리준비 3단계 : 모델을 가져옴
lr = LogisticRegression(maxIter=5, regParam=0.01)

# 요리 시작
pipeline = Pipeline(stages=[tokenizer, hashingTF, lr])

# 메인재료 투하
model = pipeline.fit(training)

# Prepare test documents, which are unlabeled (id, text) tuples.
test = spark.createDataFrame([
(4, "spark i j k"),
(5, "l m n"),
(6, "spark hadoop spark"),
(7, "apache hadoop")
], ["id", "text"])

# 예측
prediction = model.transform(test)
selected = prediction.select("id", "text", "probability", "prediction")
for row in selected.collect():
row_id, text, prob, prediction = row # 튜플
print(
# 문자열 포맷팅
"(%d, %s) -------> probability=%s, prediction=%f" % (row_id, text, str(prob), prediction)
)

# training.show()

# 세션 종료
spark.stop()

→ 저장 후 실행

python step03_pipeline.py

Untitled

pyspark_ml 실습(3)

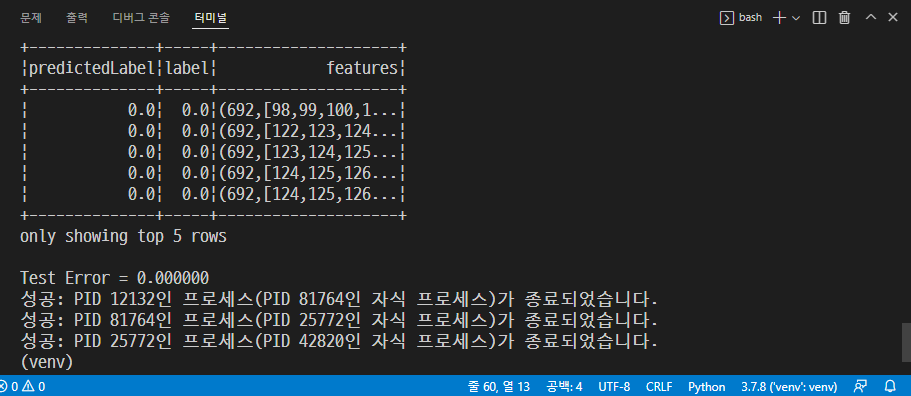
→ 파일 생성 : step03_randomforest.py

→ 코드 작성

1
2
3
4
5
6
7
8
9
10
11
12
13
14
15
16
17
18
19
20
21
22
23
24
25
26
27
28
29
30
31
32
33
34
35
36
37
38
39
40
41
42
43
44
45
46
47
48
49
50
51
52
53
54
55
56
from cProfile import label
from pyspark.sql import SparkSession

# 머신러닝 라이브러리
from pyspark.ml import Pipeline
from pyspark.ml.classification import RandomForestClassifier
from pyspark.ml.feature import IndexToString, StringIndexer, VectorIndexer
from pyspark.ml.evaluation import MulticlassClassificationEvaluator

# 데이터 불러오기
spark = SparkSession.builder.appName("RandomForest").getOrCreate()

data = spark.read.format("libsvm").load("data/mllib/sample_libsvm_data.txt")
print(type(data))

# Feature Engineering
# label column
labelIndexer = StringIndexer(inputCol='label', outputCol='indexedLabel').fit(data)

# 범주형 데이터 체크, 인덱스화
featureIndexer = VectorIndexer(inputCol='features',
outputCol='IndexedFeatures', maxCategories=4).fit(data)

# 데이터 분리
(trainingData, testData) = data.randomSplit([0.7, 0.3])

# 모델
rf = RandomForestClassifier(labelCol='indexedLabel', # 종속변수
featuresCol='IndexedFeatures', # 독립변수
numTrees=10)

# outputCol='indexedLabel' --> original label로 변환
labelConvereter = IndexToString(inputCol='prediction',
outputCol='predictedLabel', labels=labelIndexer.labels)

# 파이프라인 구축
pipeline = Pipeline(stages=[labelIndexer, featureIndexer, rf, labelConvereter])

# 모델 학습
model = pipeline.fit(trainingData)

# 모델 예측
predictions = model.transform(testData)

# 행에 표시할 것 추출
predictions.select("predictedLabel", 'label', 'features').show(5)

# 모형 평가
evaluator = MulticlassClassificationEvaluator(
labelCol="indexedLabel", predictionCol="prediction", metricName="accuracy"
)

accuracy = evaluator.evaluate(predictions)
print("Test Error = %f " % (1.0 - accuracy))

spark.stop()

→ 저장 후 실행

python step04_randomforest.py

Untitled

venv 생성되어 있는 경로로 이동

→ pip install jupyterlab

→ jupyter lab

→ 주피터랩에서 블로그에 올릴 자료 작성 가능.

Author

minkuen

Posted on

2022-05-01

Updated on

2022-05-04

Licensed under

You need to set install_url to use ShareThis. Please set it in _config.yml.
You forgot to set the business or currency_code for Paypal. Please set it in _config.yml.

Comments

You forgot to set the shortname for Disqus. Please set it in _config.yml.