JPA 환경 설정 & 실행
[강의] 자바 ORM 표준 JPA 프로그래밍 - 기본편
H2 데이터베이스 설치와 실행
최고의 실습용 DB
가볍다.(1.5M)
웹 전용 쿼리 툴 제공
MySQL, Oracle 데이터베이스 시뮬레이션 기능
시퀀스, AUTO INCREMENT 기능 지원
설치
- http://www.h2database.com/html/main.html
- downloads → archive downloads → 1.4.199 버전 다운로드
- 이후에 Spring과 결합하여 사용할 때 호환되는 버전을 고려해야 하기 때문
h2 console 실행 또는 PC 화면 하단의 tool bar에서 선택한다
- 설정
- Geniric H2 (Server)
- 연결
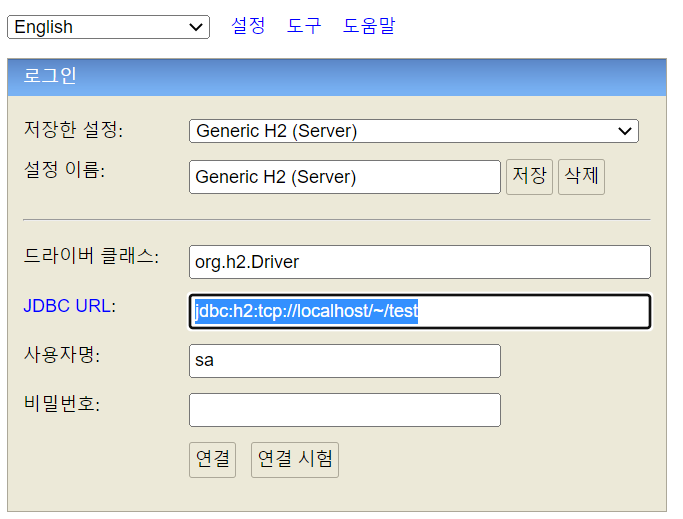
H2 연결 에러
에러 : Database “~/test” not found, and IFEXISTS=true, so we cant auto-create it [90146-199]
해결
- 다음 이미지와 같이 JDBC URL에 입력
- jdbc:h2:~/test
이후 접속
- jdbc:h2:tcp://localhost/~/test 입력해서 접속해야 한다

Extension 설치
VSCode extention
- Project Managger for Java
- Debugger for Java
- Maven for
- extention pack for java
수동 설치 방법

프로젝트 생성
- VSCode에서 프로젝트 생성
- 명령 입력 창 :
Ctrl + Shift + P Create projectMaven
내가 선택한 것들
- maven quick start
- maven 1.0 version
- groupid = com.jpabasic
- artifactId = ex1hellojpa
- 버전 입력 창 : 1.0.0eefefeef
pom.xml
- 기존 양식에 덧붙이기
- h2와 hibernate 버전 설정
1 | <dependencies> |
JPA 설정하기 - persistence.xml
- 파일 생성
- 경로 중요
- 필요한 코드 넣기
1 | <?xml version="1.0" encoding="UTF-8"?> |
- .java 파일 생성
- 예시) JpaMain.java
- 코드
- Persistence.createEntityManagerFactory(“hello”);
- “hello”는 pom.xml 파일의 persistence-unit name = “helloe” 의 값을 넣은 것이다
1 | package hellojpa; |
h2 연결
- JDBC URL
- pom.xml 에서 localhost에 적힌 부분을 그대로 넣어서 연결해야 한다
1 | // pom.xml |
드라이버 클래스, 사용자명, 비밀번호의 경우도 마찬가지다
- driver, user, password 가 적힌 부분과 일치시켜서 연결해야 한다
1
2
3
4// pom.xml
<property name="javax.persistence.jdbc.driver" value="org.h2.Driver"/>
<property name="javax.persistence.jdbc.user" value="sa"/>
<property name="javax.persistence.jdbc.password" value=""/>
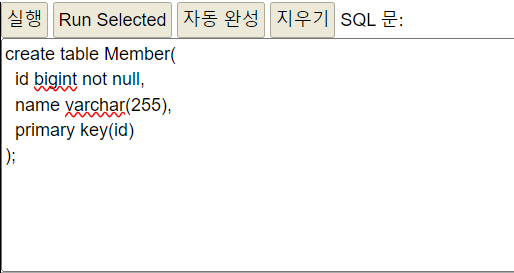
- DB에 Table 생성
1 | create table Member( |
객체와 테이블 생성하고 매핑하기
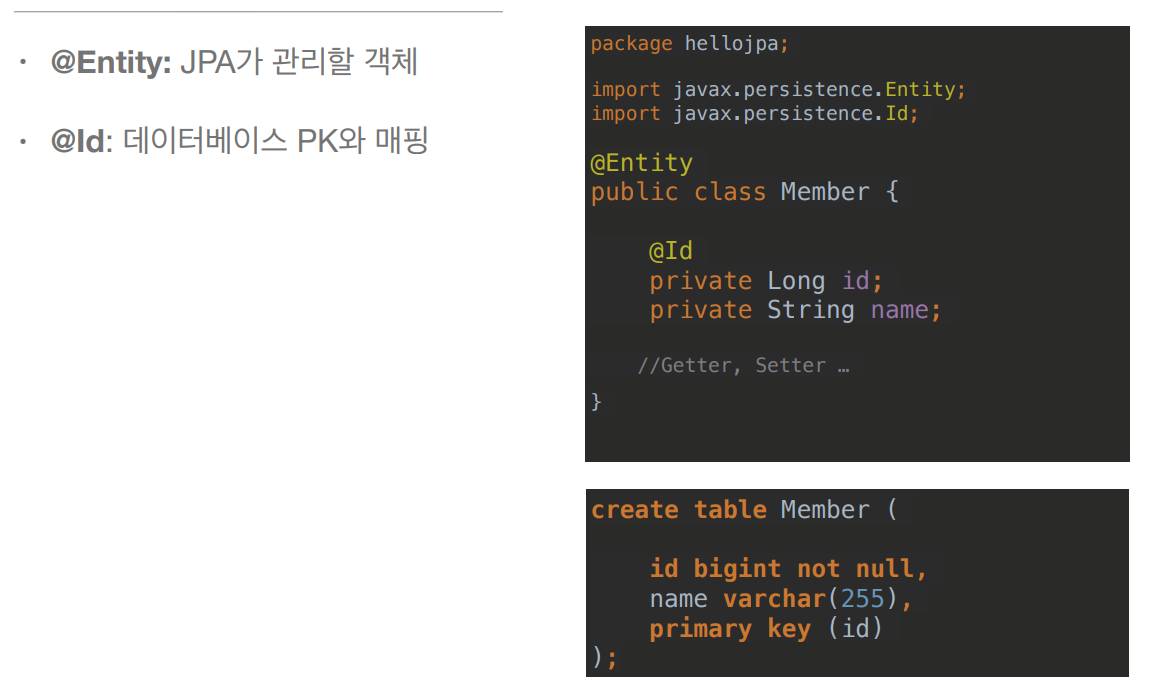
@Entity필수- getter setter 함수 생성해야 한다
- extension 설치 : Generate Getter and Setters
1 | package hellojpa; |
트랜잭션
- 간단하게 풀이하자면 DB Connection 이다
- db 관련 기능 실행할 때마다 필요하다는 듯
1 | // 트랜잭션 |
에러 해결 - hibernate 관련
에러 메시지 : hibernate property not found
db 관련 코드에 문제가 발생하면 hibernate가 db 매핑에 실패하기에 생긴 에러
검색한 바로는 jdk가 11 버전일 때도 생길 수 있다고 한다
해결
- @id 노테이션을 2번 사용한 것이 문제였다
- 이건 1개의 Pk에 2개의 컬럼을 지정해준 것과 비슷한 문제다
- 따라서 @id 한 번만 사용함으로써 해결
첫 실행. persist
실행할 함수 위에 Run | Debug 표시가 있다.
JpaMain.java
Member 클래스는 아까 정의한 id, name이 들어있는 클래스이다
1 | package com.hellojpa; |
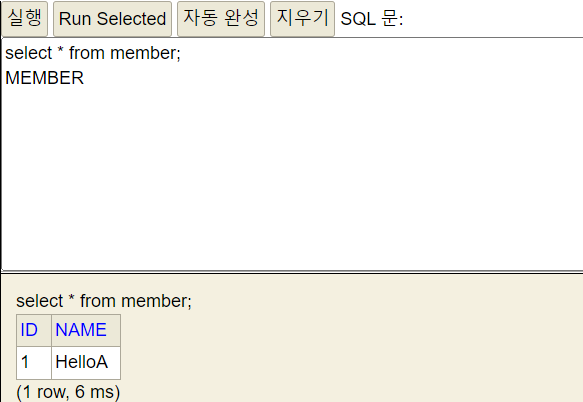
- Run 실행

- 결과
- SELECT 문을 이용해 조회한다
- DB에 INSERT 완료
주의점
엔티티 매니저 팩토리는 하나만 생성해서 애플리케이션 전체에서 공유
엔티티 매니저는 쓰레드 간에 공유X (사용하고 버려야 한다).
JPA의 모든 데이터 변경은 트랜잭션 안에서 실행
이 코드를 말하는 듯 하다
1 | EntityManagerFactory emf = Persistence.createEntityManagerFactory("JPABOOK"); |
JPA 환경 설정 & 실행
You need to set
install_url to use ShareThis. Please set it in _config.yml.