chapter_6_1

비지도 학습

  • vs 지도 학습
    • 종속 변수가 있다 = 타겟이 있다
  • 비지도 학습은 종속변수 및 타겟이 없다.
  • 분류
    • 다중분류
    • 전제조건 : (다양한 유형) 데이터가 많아야 함
    • 딥러닝과 연관이 됨(자연어 처리, 이미지)

데이터 불러오기

  • 과일가게 문제 : 많은 과일 사진을 각 과일 별로 분류해야 한다.
  • 다음을 참고하라 : http://bit.ly/hg-06-1
1
!wget https://bit.ly/fruits_300_data -O fruits_300.npy
--2022-03-31 03:09:03--  https://bit.ly/fruits_300_data
Resolving bit.ly (bit.ly)... 67.199.248.11, 67.199.248.10
Connecting to bit.ly (bit.ly)|67.199.248.11|:443... connected.
HTTP request sent, awaiting response... 301 Moved Permanently
Location: https://github.com/rickiepark/hg-mldl/raw/master/fruits_300.npy [following]
--2022-03-31 03:09:03--  https://github.com/rickiepark/hg-mldl/raw/master/fruits_300.npy
Resolving github.com (github.com)... 140.82.121.4
Connecting to github.com (github.com)|140.82.121.4|:443... connected.
HTTP request sent, awaiting response... 302 Found
Location: https://raw.githubusercontent.com/rickiepark/hg-mldl/master/fruits_300.npy [following]
--2022-03-31 03:09:03--  https://raw.githubusercontent.com/rickiepark/hg-mldl/master/fruits_300.npy
Resolving raw.githubusercontent.com (raw.githubusercontent.com)... 185.199.111.133, 185.199.108.133, 185.199.110.133, ...
Connecting to raw.githubusercontent.com (raw.githubusercontent.com)|185.199.111.133|:443... connected.
HTTP request sent, awaiting response... 200 OK
Length: 3000128 (2.9M) [application/octet-stream]
Saving to: ‘fruits_300.npy’

fruits_300.npy      100%[===================>]   2.86M  --.-KB/s    in 0.03s   

2022-03-31 03:09:03 (107 MB/s) - ‘fruits_300.npy’ saved [3000128/3000128]
  • numpy 파일을 불러옴
1
2
3
4
5
6
import numpy as np
import matplotlib.pyplot as plt

fruits = np.load('fruits_300.npy')
print(fruits.shape)
print(fruits.ndim) # 차원 수 확인
(300, 100, 100)
3
  • 첫 번째 차원(300) = 샘플의 개수
  • 두 번째 차원(100) = 이미지 높이
  • 세 번째 차원(100) = 이미지 너비
  • 이미지 크기 100 x 100
1
2
# 첫 번째 행에 있는 픽셀 100개에 들어있는 값을 출력
fruits[0, 0, :]
array([  1,   1,   1,   1,   1,   1,   1,   1,   1,   1,   1,   1,   1,
         1,   1,   1,   2,   1,   2,   2,   2,   2,   2,   2,   1,   1,
         1,   1,   1,   1,   1,   1,   2,   3,   2,   1,   2,   1,   1,
         1,   1,   2,   1,   3,   2,   1,   3,   1,   4,   1,   2,   5,
         5,   5,  19, 148, 192, 117,  28,   1,   1,   2,   1,   4,   1,
         1,   3,   1,   1,   1,   1,   1,   2,   2,   1,   1,   1,   1,
         1,   1,   1,   1,   1,   1,   1,   1,   1,   1,   1,   1,   1,
         1,   1,   1,   1,   1,   1,   1,   1,   1], dtype=uint8)
  • 이미지 시각화
    • 흑백 사진을 담고 있다.
    • 0~255까지의 정숫값을 가진다.
1
2
plt.imshow(fruits[0], cmap='gray')  # cmap 은 옵션
plt.show()

png

1
2
3
4
plt.imshow(fruits[0], cmap='gray_r')  # cmap 은 옵션
plt.show()
# 밝은 부분은 0에 가깝다
# 어두운 부분은 255에 가깝다

png

  • 여러 이미지 시각화
1
2
3
4
5
fig, axs = plt.subplots(1, 2)
axs[0].imshow(fruits[100], cmap='gray_r')
axs[1].imshow(fruits[200], cmap='gray_r')

plt.show()

png

픽셀값 분석

1
2
3
4
5
6
7
apple = fruits[0:100].reshape(-1, 100 * 100)  # 두 번째와 세 번째 차원 크기가 100이므로.
pineapple = fruits[100:200].reshape(-1, 100 * 100)
banana = fruits[200:300].reshape(-1, 100 * 100)

print(apple.shape)
print(pineapple.shape)
print(banana.shape)
(100, 10000)
(100, 10000)
(100, 10000)
  • axis = 0 vs axis = 1 차이 확인 (p.293)

  • 각 이미지에 대한 픽셀 평균값 비교

1
2
# axis = 1 = 열
print(apple.mean(axis = 1))
[ 88.3346  97.9249  87.3709  98.3703  92.8705  82.6439  94.4244  95.5999
  90.681   81.6226  87.0578  95.0745  93.8416  87.017   97.5078  87.2019
  88.9827 100.9158  92.7823 100.9184 104.9854  88.674   99.5643  97.2495
  94.1179  92.1935  95.1671  93.3322 102.8967  94.6695  90.5285  89.0744
  97.7641  97.2938 100.7564  90.5236 100.2542  85.8452  96.4615  97.1492
  90.711  102.3193  87.1629  89.8751  86.7327  86.3991  95.2865  89.1709
  96.8163  91.6604  96.1065  99.6829  94.9718  87.4812  89.2596  89.5268
  93.799   97.3983  87.151   97.825  103.22    94.4239  83.6657  83.5159
 102.8453  87.0379  91.2742 100.4848  93.8388  90.8568  97.4616  97.5022
  82.446   87.1789  96.9206  90.3135  90.565   97.6538  98.0919  93.6252
  87.3867  84.7073  89.1135  86.7646  88.7301  86.643   96.7323  97.2604
  81.9424  87.1687  97.2066  83.4712  95.9781  91.8096  98.4086 100.7823
 101.556  100.7027  91.6098  88.8976]
  • 각 과일에 대한 히스토그램 작성
    • 히스토그램은 값이 발생하는 빈도를 그래프로 표시한 것.
    • 보통 x축은 값의 구간이고, y축은 발생 빈도이다.
1
2
3
4
5
6
7
plt.hist(np.mean(apple, axis = 1), alpha = 0.8)     # alpha 는 투명도 조절하는 매개변수
plt.hist(np.mean(pineapple, axis = 1), alpha = 0.8)
plt.hist(np.mean(banana, axis = 1), alpha = 0.8)
plt.legend(['apple', 'pineapple', 'banana'])
plt.xlabel('pixel average')
plt.ylabel('prequency')
plt.show()

png

  • 위 결과에서 banana는 픽셀 평균값이 다른 두 과일과 확연히 다르다.

    • banana는 픽셀 평균값으로 구분하기 쉽다.
  • 이번에는 샘플의 평균값이 아니라 픽셀별 평균값을 비교해 본다.

  • 즉, 전체 샘플에 대해 각 픽셀의 평균을 조사한다.

  • axis=0으로 지정하여 픽셀의 평균을 계산하면 된다.

1
2
3
4
5
fig, axs = plt.subplots(1, 3, figsize=(20, 5))
axs[0].bar(range(10000), np.mean(apple, axis=0))
axs[1].bar(range(10000), np.mean(pineapple, axis=0))
axs[2].bar(range(10000), np.mean(banana, axis=0))
plt.show()

png

  • 대표 이미지
1
2
3
4
5
6
7
8
9
apple_mean = np.mean(apple, axis=0).reshape(100, 100)
pineapple_mean = np.mean(pineapple, axis=0).reshape(100, 100)
banana_mean = np.mean(banana, axis=0).reshape(100, 100)

fig, axs = plt.subplots(1, 3, figsize=(20, 5))
axs[0].imshow(apple_mean, cmap='gray_r')
axs[1].imshow(pineapple_mean, cmap='gray_r')
axs[2].imshow(banana_mean, cmap='gray_r')
plt.show()

png

평균값과 가까운 사진 고르기

1
2
3
abs_diff = np.abs(fruits - apple_mean)
abs_mean = np.mean(abs_diff, axis=(1,2))
print(abs_mean.shape)
(300,)
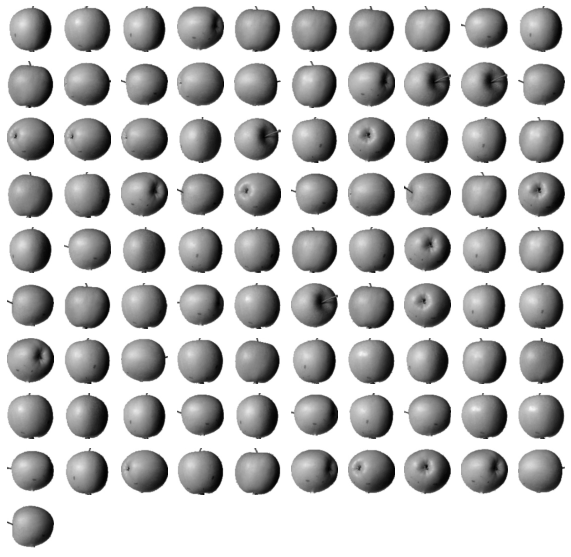
  • 오차의 값이 가장 작은 순서대로 100개를 골라본다.
1
2
3
apple_index = np.argsort(abs_mean)[:100]
fig, axs = plt.subplots(10, 10, figsize=(10,10))
plt.show()

png

1
2
3
4
5
6
7
apple_index = np.argsort(abs_mean)[:100]
fig, axs = plt.subplots(10, 10, figsize=(10,10))
for i in range(10): # 2중 for문
for j in range(10):
axs[i, j].imshow(fruits[apple_index[i*10 + j]], cmap='gray_r')
axs[i, j].axis('off')
plt.show()

png

  • Reference : 혼자 공부하는 머신러닝 + 딥러닝
chapter_6_3

주성분 분석 (PCA)

PCA (주성분 분석)

  • 차원축소의 개념

  • PCA 개념

  • 과일 사진의 겨우, 10,000개의 픽셀 (높이 x 너비)

  • 10,000개의 특성이 있는 셈(차원)

  • 정형데이터에서도 활용 가능

    • 문자열 데이터, 수치형 데이터 (연속형 데이터, 비연속형 데이터)
    • 캐글 대회 : 수치형 컬럼 304개
      • 연산은 RAM에서 처리
      • 라면을 5개 끓여야 함 / 냄비 크기는 3개 용량
  • 차원축소 = 일부 특성을 선택하여 데이터 크기를 줄임

    • 머신러닝 측면 : 과대적합 방지 & 성능 향상
    • 데이터가 너무 많으니까 RAM에 부하가 걸린다.
    • 따라서 데이터를 줄이고 과대적합을 방지하기 위한 것
  • 양적 데이터 사이의 분산-공분산 관계를 이용해서 선형결합으로 표시되는 주성분을 찾음

  • 2~3개의 주성분으로 전체 변동을 찾는 것이 PCA

p326

  • 그래프를 보면, 처음 10개의 주성분이 (10,000개의 픽셀)

  • 굳이 10,000개의 픽셀을 전부 쓸 필요가 없다.

  • 알고리즘 구성할 때, 필요한 데이터 픽셀 수, 300 x 10,000개 픽셀

  • 원래는 300 x 10,000개 픽셀 필요

  • 그런데, 300 x pc 10 주성분으로 줄임

  • 기존 1시간 걸림 / 이제 10분 걸림

  • 그럼에도 불구하고, 분류가 더 잘되더라.

PCA 클래스

데이터 불러오기

1
!wget https://bit.ly/fruits_300_data -O fruits_300.npy
--2022-03-31 06:16:36--  https://bit.ly/fruits_300_data
Resolving bit.ly (bit.ly)... 67.199.248.11, 67.199.248.10
Connecting to bit.ly (bit.ly)|67.199.248.11|:443... connected.
HTTP request sent, awaiting response... 301 Moved Permanently
Location: https://github.com/rickiepark/hg-mldl/raw/master/fruits_300.npy [following]
--2022-03-31 06:16:36--  https://github.com/rickiepark/hg-mldl/raw/master/fruits_300.npy
Resolving github.com (github.com)... 192.30.255.113
Connecting to github.com (github.com)|192.30.255.113|:443... connected.
HTTP request sent, awaiting response... 302 Found
Location: https://raw.githubusercontent.com/rickiepark/hg-mldl/master/fruits_300.npy [following]
--2022-03-31 06:16:36--  https://raw.githubusercontent.com/rickiepark/hg-mldl/master/fruits_300.npy
Resolving raw.githubusercontent.com (raw.githubusercontent.com)... 185.199.108.133, 185.199.109.133, 185.199.110.133, ...
Connecting to raw.githubusercontent.com (raw.githubusercontent.com)|185.199.108.133|:443... connected.
HTTP request sent, awaiting response... 200 OK
Length: 3000128 (2.9M) [application/octet-stream]
Saving to: ‘fruits_300.npy’

fruits_300.npy      100%[===================>]   2.86M  --.-KB/s    in 0.04s   

2022-03-31 06:16:36 (64.8 MB/s) - ‘fruits_300.npy’ saved [3000128/3000128]
  • 배열로 업로드
1
2
3
4
import numpy as np
fruits = np.load("fruits_300.npy")
fruits_2d = fruits.reshape(-1, 100*100)
fruits_2d.shape
(300, 10000)
  • sklearn.decomposition 모듈
    • 사이킷런은 이 모듈 아래 PCA 클래스로 주성분 분석 알고리즘을 제공한다.
    • k-평균과 마찬가지로 비지도 학습이기 때문에 fit()메서드에 타깃값을 제공하지 않는다.
1
2
3
4
5
from sklearn.decomposition import PCA
pca = PCA(n_components = 50)

# PCA 50개 성분으로 300 x 10000 픽셀값을 압축
pca.fit(fruits_2d)
PCA(n_components=50)
  • PCA 클래스가 찾은 주성분은 components_ 속성에 저장되어 있다.
1
print(pca.components_.shape)
(50, 10000)
  • 그래프 그리기
    • draw_fuits()함수를 사용해서 이 주성분을 그림으로 그려보자.
1
2
3
4
5
6
7
8
9
10
11
12
13
14
15
16
17
18
import matplotlib.pyplot as plt

def draw_fruits(arr, ratio=1):
n = len(arr) # n은 샘플 개수입니다
# 한 줄에 10개씩 이미지를 그립니다. 샘플 개수를 10으로 나누어 전체 행 개수를 계산합니다.
rows = int(np.ceil(n/10))
# 행이 1개 이면 열 개수는 샘플 개수입니다. 그렇지 않으면 10개입니다.
cols = n if rows < 2 else 10
fig, axs = plt.subplots(rows, cols,
figsize=(cols*ratio, rows*ratio), squeeze=False)
for i in range(rows):
for j in range(cols):
if i*10 + j < n: # n 개까지만 그립니다.
axs[i, j].imshow(arr[i*10 + j], cmap='gray_r')
axs[i, j].axis('off')
plt.show()

draw_fruits(pca.components_.reshape(-1, 100, 100))

png

1
2
fruits_pca = pca.transform(fruits_2d)
print(fruits_pca.shape)
(300, 50)
  • 데이터의 원래 크기 대비해서 1/200 줄임
  • 용량이 줄었다는 것과 똑같음

원본 데이터 재구성

  • 10,000개의 특성을 50개로 줄임
  • 100% 재구성은 어렵지만, 그래도 쓸만하다.
1
2
fruits_inverse = pca.inverse_transform(fruits_pca)
print(fruits_inverse.shape)
(300, 10000)
  • 그래프 작성
    • 10000개의 데이터가 복원되었다.
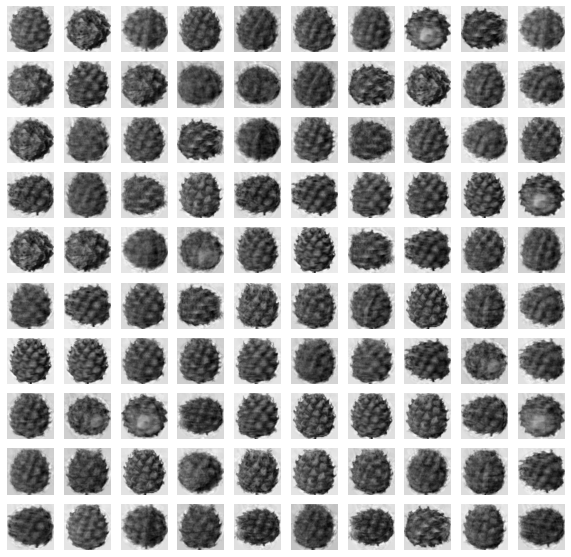
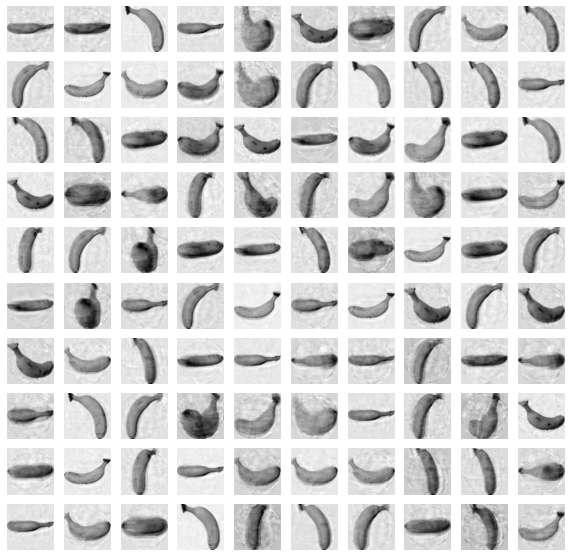
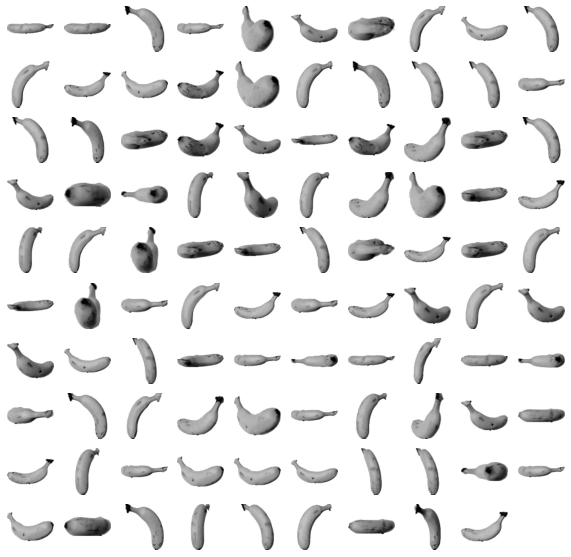
    • 이 데이터를 100 x 100 크기로 바꾸어 100개씩 나누어 출력한다.
1
2
fruits_reconstruct = fruits_inverse.reshape(-1, 100, 100)
print(fruits_reconstruct.shape)
(300, 100, 100)
1
2
3
4
# 압축을 풀고 사용하는 연쇄적인 과정
for start in [0, 100, 200]:
draw_fruits(fruits_reconstruct[start:start + 100])
print("\n")

png

png

png

설명된 분산

1
2
plt.plot(pca.explained_variance_ratio_)
plt.show()

png

  • 처음 10개의 주성분이 대부분의 분산을 표현한다.
  • 11개 주성분부터 ~50개까지는 잘 설명이 안됨
1
print(np.sum(pca.explained_variance_ratio_))
0.9215782334086065

다른 알고리즘과 함께 사용하기

  • 3개의 과일 사진 분류 위해 로지스틱 회귀
1
2
3
4
5
6
from sklearn.linear_model import LogisticRegression

lr = LogisticRegression()

target = np.array([0]*100 + [1]*100 + [2]*100)
print(target)
[0 0 0 0 0 0 0 0 0 0 0 0 0 0 0 0 0 0 0 0 0 0 0 0 0 0 0 0 0 0 0 0 0 0 0 0 0
 0 0 0 0 0 0 0 0 0 0 0 0 0 0 0 0 0 0 0 0 0 0 0 0 0 0 0 0 0 0 0 0 0 0 0 0 0
 0 0 0 0 0 0 0 0 0 0 0 0 0 0 0 0 0 0 0 0 0 0 0 0 0 0 1 1 1 1 1 1 1 1 1 1 1
 1 1 1 1 1 1 1 1 1 1 1 1 1 1 1 1 1 1 1 1 1 1 1 1 1 1 1 1 1 1 1 1 1 1 1 1 1
 1 1 1 1 1 1 1 1 1 1 1 1 1 1 1 1 1 1 1 1 1 1 1 1 1 1 1 1 1 1 1 1 1 1 1 1 1
 1 1 1 1 1 1 1 1 1 1 1 1 1 1 1 2 2 2 2 2 2 2 2 2 2 2 2 2 2 2 2 2 2 2 2 2 2
 2 2 2 2 2 2 2 2 2 2 2 2 2 2 2 2 2 2 2 2 2 2 2 2 2 2 2 2 2 2 2 2 2 2 2 2 2
 2 2 2 2 2 2 2 2 2 2 2 2 2 2 2 2 2 2 2 2 2 2 2 2 2 2 2 2 2 2 2 2 2 2 2 2 2
 2 2 2 2]
  • 교차검증 진행
1
2
3
4
from sklearn.model_selection import cross_validate
scores = cross_validate(lr, fruits_2d, target)
print(np.mean(scores['test_score']))
print(np.mean(scores['fit_time']))
0.9966666666666667
1.5795912265777587
  • PCA 수행 후, 학습 시간 비교
1
2
3
scores = cross_validate(lr, fruits_pca, target)
print(np.mean(scores['test_score']))
print(np.mean(scores['fit_time']))
1.0
0.12322616577148438
  • PCA 수행 후, fit_time이 짧게 단축되었다.

    • 1.57 -> 0.12 로 시간이 짧아졌다.
    • 그러니 특성이 너무 많으면 PCA를 사용하자.
  • 주 성분의 매개변수 개수 지정, 분산비율 지정

1
2
3
pca = PCA(n_components = 0.5)
pca.fit(fruits_2d)
print(pca.n_components_)
2
  • 주성분을 2개로 압축시킴.
1
2
fruits_pca = pca.transform(fruits_2d)
print(fruits_pca.shape)
(300, 2)
1
2
3
scores = cross_validate(lr, fruits_pca, target)
print(np.mean(scores['test_score']))
print(np.mean(scores['fit_time']))
0.9933333333333334
0.051814031600952146


/usr/local/lib/python3.7/dist-packages/sklearn/linear_model/_logistic.py:818: ConvergenceWarning: lbfgs failed to converge (status=1):
STOP: TOTAL NO. of ITERATIONS REACHED LIMIT.

Increase the number of iterations (max_iter) or scale the data as shown in:
    https://scikit-learn.org/stable/modules/preprocessing.html
Please also refer to the documentation for alternative solver options:
    https://scikit-learn.org/stable/modules/linear_model.html#logistic-regression
  extra_warning_msg=_LOGISTIC_SOLVER_CONVERGENCE_MSG,
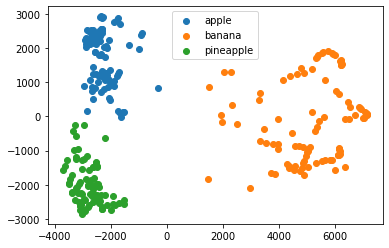
  • 차원 축소된 데이터를 k-평균 알고리즘에 추가한다.
1
2
3
4
from sklearn.cluster import KMeans
km = KMeans(n_clusters=3, random_state=42)
km.fit(fruits_pca)
print(np.unique(km.labels_, return_counts = True))
(array([0, 1, 2], dtype=int32), array([110,  99,  91]))
1
2
3
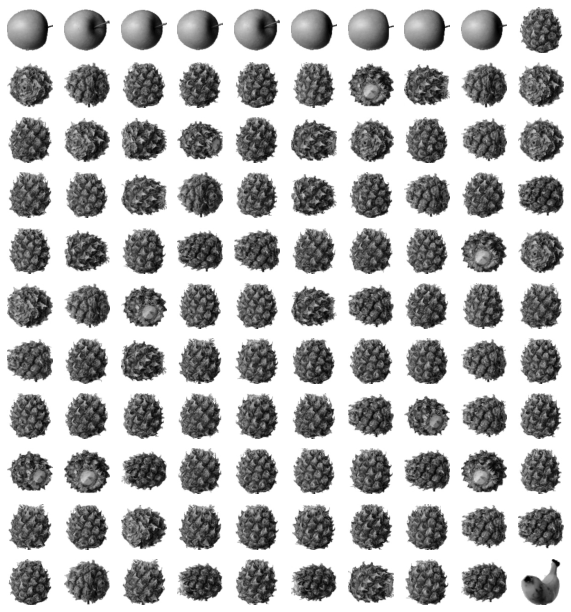
for label in range(0,3):
draw_fruits(fruits[km.labels_ == label])
print("\n")

png

png

png

  • 시각화로 뿌려주기
1
2
3
4
5
for label in range(0,3):
data = fruits_pca[km.labels_ == label]
plt.scatter(data[:, 0], data[:, 1])
plt.legend(['apple', 'banana', 'pineapple'])
plt.show()

png

  • Reference : 혼자 공부하는 머신러닝 + 딥러닝

chapter_5_3

트리의 앙상블

  • lightGBM 기억!
    • GBM –> XGBoost –> LightGBM
    • 참고 1. 모델개발속도가 빨라졌나?
    • 참고 2. 모델의 성능이 좋아졌나?
  • TabNet(2019)
    • 딥러닝 컨셉!

랜덤 포레스트(Forest)

  • 결정 트리를 랜덤하게 만들어 결정 트리의 숲을 만든다.

  • 결정 트리 나무를 500개 심기

  • 최종적인 결정은 투표 방식

    • 나무-1 : 양성
    • 나무_2 : 음성
    • 나무_3 : 양성
      ..
    • 나무-500 : 양성
  • 데이터 불러오기

  • 넘파이 배열로 변환

  • 데이터 세트 나누기

1
2
3
4
5
6
7
8
9
10
11
12
13
import numpy as np
import pandas as pd
from sklearn.model_selection import train_test_split

wine = pd.read_csv('https://bit.ly/wine_csv_data')

data = wine[['alcohol', 'sugar', 'pH']].to_numpy()
target = wine['class'].to_numpy()

train_input, test_input, train_target, test_target = train_test_split(data,
target,
test_size=0.2,
random_state=42)
  • 267p
    • cross_validate()함수 : 교차 검증 수행
    • RandomForestClassifier는 기본적으로 100개의 트리를 사용하므로 n_jops=-1로 지정하여 모든 CPU 코어를 사용한다.
1
2
3
4
5
6
7
from sklearn.model_selection import cross_validate
from sklearn.ensemble import RandomForestClassifier
rf = RandomForestClassifier(n_jobs=-1, random_state=42) # n_jobs = -1은 pc의 모든 코어를 사용하겠다는 뜻
scores = cross_validate(rf, train_input, train_target,
return_train_score = True, n_jobs=-1)

print(np.mean(scores['train_score']), np.mean(scores['test_score']))
0.9973541965122431 0.8905151032797809
  • 랜덤 포레스트는 결정 트리의 앙상블이기 때문에 DecisionTreeClassifier가 제공하는 매개변수를 모두 제공한다.
  • 또한 결정 트리의 큰 장점 중 하나인 특성 중요도를 계산한다.
  • 랜덤 포레스트 모델을 훈련 세트에 훈련한 후 특성 중요도를 출력해 본다.
1
2
rf.fit(train_input, train_target)
print(rf.feature_importances_)
[0.23167441 0.50039841 0.26792718]
  • 두 번째 특성인 sugar가 가장 중요도가 높다는 것을 알 수 있다.

  • RandomForestClassifier는 자체적으로 모델을 평가하는 점수를 얻을 수도 있다.

  • 이 점수를 얻으려면 RandomForestClassifier 클래스의 oob_score 매개변수를 True로 지정해야 한다.

  • oob_score = True로 지정하고 모델을 훈련하여 OOB 점수를 출력해보자.

1
2
3
rf = RandomForestClassifier(oob_score = True, n_jobs=-1, random_state=42)
rf.fit(train_input, train_target)
print(rf.oob_score_)
0.8934000384837406
  • 교차 검즈에서 얻은 점수와 매우 비슷한 결과를 얻었다.

그래이디언트 부스팅

  • 그 이전 트리의 오차를 보완하는 방식으로 사용
  • 깊이가 얕은 트리를 사용.
  • 학습률 매개변수로 속도를 조절.
  • 단점 : 속도가 느림.
1
2
3
4
5
6
from sklearn.ensemble import GradientBoostingClassifier
gb = GradientBoostingClassifier(random_state=42)
scores = cross_validate(gb, train_input, train_target,
return_train_score = True, n_jobs=-1)

print(np.mean(scores['train_score']), np.mean(scores['test_score']))
0.8881086892152563 0.8720430147331015
  • 거의 과대적합이 되지 않았다.
  • 그래디언트 부스팅은 결정 트리의 개수를 늘려도 과대적합에 매우 강하다.
  • 학습률을 증가시키고 트리의 개수를 늘리면 조금 더 성능이 향상될 수 있다.
1
2
3
4
5
gb = GradientBoostingClassifier(n_estimators = 500, learning_rate = 0.2, random_state = 42)
scores = cross_validate(gb, train_input, train_target,
return_train_score = True, n_jobs=-1)

print(np.mean(scores['train_score']), np.mean(scores['test_score']))
0.9464595437171814 0.8780082549788999
  • 결정 트리 개수를 500개로 늘렸다. 5배로 늘렸지만 과대적합을 잘 억제하고 있다.
  • 학습률 learning_rate의 기본값은 0.1이다.
  • 그레이디언트 부스팅도 특성 중요도를 제공한다.
  • 결과에서 볼 수 있듯이 그레이디언트 부스팅이 랜덤 포레스트보다 일부 특성(당도)에 더 집중한다.
1
2
gb.fit(train_input, train_target)
print(gb.feature_importances_)
[0.15872278 0.68010884 0.16116839]
  • 흐름

      1. 데이터 전처리 / 시각화
      1. 기본 모형으로 전체 흐름을 설계
      1. 여러 모형으로 비교 대조
      1. 교차 검증, 하이퍼 파라미터 성능 비교
    • 1등 하는 그날까지
  • Reference : 혼자 공부하는 머신러닝 + 딥러닝

chapter_5_1

결정 트리

  • 결정 트리로 다음 문제를 해결해 보자
    • 와인 캔에 인쇄된 알코올 도수, 당도, pH값으로 와인 종류를 구별해야 한다.

로지스틱 회귀로 와인 분류하기

  • 우선 로지스틱 회귀로 문제 해결을 시도해본다.

데이터 불러오기

  • 와인데이터
    • alcohol(알고올 도수), sugar(당도), pH(산도)
    • 클래스 0 = 레드 와인
    • 클래스 1 = 화이트 와인
1
2
3
import pandas as pd
wine = pd.read_csv('https://bit.ly/wine_csv_data')
wine.head(5) # 데이터 잘 들어왔는지 확인

alcohol sugar pH class
0 9.4 1.9 3.51 0.0
1 9.8 2.6 3.20 0.0
2 9.8 2.3 3.26 0.0
3 9.8 1.9 3.16 0.0
4 9.4 1.9 3.51 0.0

  <script>
    const buttonEl =
      document.querySelector('#df-ed50d596-f5ff-4ae2-a52f-cd3b0b3d75ad button.colab-df-convert');
    buttonEl.style.display =
      google.colab.kernel.accessAllowed ? 'block' : 'none';

    async function convertToInteractive(key) {
      const element = document.querySelector('#df-ed50d596-f5ff-4ae2-a52f-cd3b0b3d75ad');
      const dataTable =
        await google.colab.kernel.invokeFunction('convertToInteractive',
                                                 [key], {});
      if (!dataTable) return;

      const docLinkHtml = 'Like what you see? Visit the ' +
        '<a target="_blank" href=https://colab.research.google.com/notebooks/data_table.ipynb>data table notebook</a>'
        + ' to learn more about interactive tables.';
      element.innerHTML = '';
      dataTable['/images/chapter_5_1/output_type'] = 'display_data';
      await google.colab./images/chapter_5_1/output.render/images/chapter_5_1/output(dataTable, element);
      const docLink = document.createElement('div');
      docLink.innerHTML = docLinkHtml;
      element.appendChild(docLink);
    }
  </script>
</div>
  • info()
    • 결측치 확인 / 변수 타입
1
wine.info()
<class 'pandas.core.frame.DataFrame'>
RangeIndex: 6497 entries, 0 to 6496
Data columns (total 4 columns):
 #   Column   Non-Null Count  Dtype  
---  ------   --------------  -----  
 0   alcohol  6497 non-null   float64
 1   sugar    6497 non-null   float64
 2   pH       6497 non-null   float64
 3   class    6497 non-null   float64
dtypes: float64(4)
memory usage: 203.2 KB
1
2
wine.describe()
# 표준화가 안되어 있음을 알 수 있다.

alcohol sugar pH class
count 6497.000000 6497.000000 6497.000000 6497.000000
mean 10.491801 5.443235 3.218501 0.753886
std 1.192712 4.757804 0.160787 0.430779
min 8.000000 0.600000 2.720000 0.000000
25% 9.500000 1.800000 3.110000 1.000000
50% 10.300000 3.000000 3.210000 1.000000
75% 11.300000 8.100000 3.320000 1.000000
max 14.900000 65.800000 4.010000 1.000000

  <script>
    const buttonEl =
      document.querySelector('#df-decc42d0-d914-4603-8cd7-d87f4c9e480a button.colab-df-convert');
    buttonEl.style.display =
      google.colab.kernel.accessAllowed ? 'block' : 'none';

    async function convertToInteractive(key) {
      const element = document.querySelector('#df-decc42d0-d914-4603-8cd7-d87f4c9e480a');
      const dataTable =
        await google.colab.kernel.invokeFunction('convertToInteractive',
                                                 [key], {});
      if (!dataTable) return;

      const docLinkHtml = 'Like what you see? Visit the ' +
        '<a target="_blank" href=https://colab.research.google.com/notebooks/data_table.ipynb>data table notebook</a>'
        + ' to learn more about interactive tables.';
      element.innerHTML = '';
      dataTable['/images/chapter_5_1/output_type'] = 'display_data';
      await google.colab./images/chapter_5_1/output.render/images/chapter_5_1/output(dataTable, element);
      const docLink = document.createElement('div');
      docLink.innerHTML = docLinkHtml;
      element.appendChild(docLink);
    }
  </script>
</div>

표준화 작업

  • 배열로 바꿔서 진행
1
2
data = wine[['alcohol', 'sugar', 'pH']].to_numpy()  # 참고할 데이터
target = wine['class'].to_numpy() # class = 타깃값 = 어떤 와인인지 구분하는 것이 목표

훈련데이터와 테스트데이터로 분리

  • train_test_split() 함수는 설정값을 지정하지 않으면 25%를 테스트 세트로 지정한다.
  • 이번엔 샘플 개수가 충분히 많으므로 20% 정도만 테스트 세트로 나눈다.
  • test = 0.2 에는 이러한 의도가 담겨 있다.
1
2
3
4
5
6
from sklearn.model_selection import train_test_split
train_input, test_input, train_target, test_target = train_test_split(
data, target, test_size=0.2, random_state=42 # test_size=0.2 는 20%를 테스트 세트로 한다는 뜻.
)

print(train_input.shape, test_input.shape)
(5197, 3) (1300, 3)
  • 이제 표준화 진행하자
1
2
3
4
5
from sklearn.preprocessing import StandardScaler
ss = StandardScaler()
ss.fit(train_input)
train_scaled = ss.transform(train_input)
test_scaled = ss.transform(test_input)

모델 만들기

로지스틱 회귀

  • 표준변환된 train_scaled와 test_scaled를 사용해 로지스틱 회귀 모델을 훈련한다.
1
2
3
4
5
6
from sklearn.linear_model import LogisticRegression
lr = LogisticRegression()
lr.fit(train_scaled, train_target)
print(lr.score(train_scaled, train_target))
print(lr.score(test_scaled, test_target))
print(lr.coef_, lr.intercept_)
0.7808350971714451
0.7776923076923077
[[ 0.51270274  1.6733911  -0.68767781]] [1.81777902]
  • 점수가 높게 나오지 않았다.
  • 결정 트리를 이용하여 좀 더 쉽게 문제를 해결해보자

로지스틱 회귀

  • 수식

의사결정트리의 기본 알고리즘을 활용해서, MS, 구글 등 이런 회사들이 신규 알고리즘을 만듬

  • XGBoost, lightGBM, CatBoost
  • 캐글 정형데이터
  • lightGBM (지금 현재 실무에서 많이 쓰임)
    • 4월 말까지는 코드에 집중. 대회 나감
    • PPT (알고리즘 소개)

결정 트리 (Decision Tree)

  • 스무 고개와 같다.
  • 질문을 하나씩 던져서 정답과 맞춰가는 것이다.
  • 표준화된 훈련 세트를 이용하여 결정트리를 사용해 본다.
1
2
3
4
5
6
from sklearn.tree import DecisionTreeClassifier
dt = DecisionTreeClassifier(random_state=42)
dt.fit(train_scaled, train_target)

print(dt.score(train_scaled, train_target)) # 훈련 세트
print(dt.score(test_scaled, test_target)) # 테스트 세트
0.996921300750433
0.8592307692307692
  • 위 코드의 두 결과는 차이가 있다.
  • 두 결과가 유사하게 나와야 한다.
  • 앞으로 ‘가지치기’에서 차이를 좁히는 과정을 진행한다.
1
2
3
4
5
6
# 현재 트리의 형태를 출력해본다.
import matplotlib.pyplot as plt
from sklearn.tree import plot_tree
plt.figure(figsize=(10,7))
plot_tree(dt)
plt.show()

png

  • 과대적합이 나오는 이유 : 조건식을 걸기 때문
1
2
3
4
# plot_tree()함수에서 트리의 깊이를 제한하여 출력해 본다.
plt.figure(figsize=(10,7))
plot_tree(dt, max_depth=1, filled=True, feature_names=['alcohol', 'sugar', 'pH'])
plt.show()

png

  • 불순도 : 운동회 ox 퀴즈에서 정답을 맞힌 사람만 살아남는 것과 같은 원리

가지치기

  • 과대적합을 방지하기 위한 것
  • 가지치기를 통해 두 결과가 유사하게 출력된다.
1
2
3
4
dt = DecisionTreeClassifier(max_depth = 3, random_state=42) # max_depth 매개변수 조절을 통해 가지치기 한다.
dt.fit(train_scaled, train_target)
print(dt.score(train_scaled, train_target)) # 훈련 세트
print(dt.score(test_scaled, test_target)) # 데이터 세트
0.8454877814123533
0.8415384615384616
  • 훈련 세트와 테스트 성능이 유사하게 출력되었다.
  • 이런 모델을 트리 그래프로 그린다면 훨씬 이해햐기 쉬울 것이다.
1
2
3
plt.figure(figsize=(20,15))
plot_tree(dt, filled=True, feature_names=['alcohol', 'sugar', 'pH'])
plt.show()

png

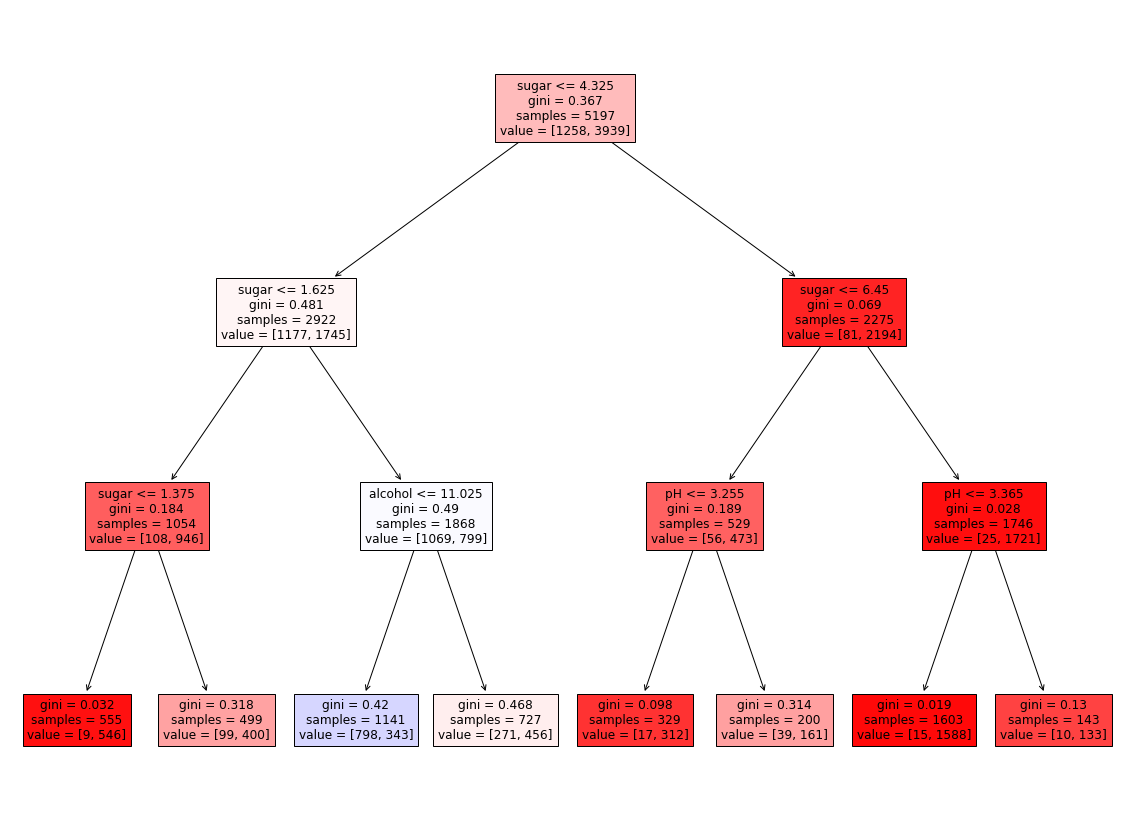
  • 훨씬 보기 좋게 출력되었다.

  • 루트 노트

    • 당도(sugar)를 기준으로 훈련세트를 나눈다.
  • 깊이 1의 노드

    • 모두 당도(sugar)를 기준으로 훈련 세트를 나눈다.
  • 깊이 2의 노드

    • 맨 왼쪽의 노드만 당도를 기준으로 나눈다.
    • 왼쪽에서 두 번째 노드는 알고올 도수(alcohol)를 기준으로 나눈다.
    • 오른쪽 두 노드는 pH를 기준으로 나눈다.
  • 리프 노드

    • 왼쪽에서 3번째에 있는 노드만 음성 클래스가 더 많다.
      • 이 노드에 도착해야만 레드 와인으로 예측한다.
      • 이 노드에 도달하려면 -0.802 < sugar < -0.239, alcohol < -0.454 라는 조건을 만족해야 한다.
      • 즉, -0.802 < sugar < -0.239, alcohol < -0.454 이면 레드와인이다
  • 그런데 -0.802라는 음수로 된 당도를 어떻게 설명해야할까?

    • 좀 더 설명하기 쉽게 바꿔보자.
  • 특성값의 스케일은 결정 트리 알고리즘에 아무런 영향을 미치지 않는다.

  • 따라서 표준화 전처리를 할 필요가 없다.

  • 전처리하기 전의 훈련 세트(train_input)와 테스트 세트(test_input)로 결정 트리 모델을 다시 훈련해 본다.

1
2
3
4
5
6
dt = DecisionTreeClassifier(max_depth=3, random_state=42)

# 가지치기 때와 달리 train_scaled를 사용하지 않았다. 표준화 전처리 할 필요가 없기 때문인 듯.
dt.fit(train_input, train_target)
print(dt.score(train_input, train_target))
0.8454877814123533
0.8454877814123533
  • 정확히 같은 결과가 나왔다.
  • 트리도 그려보자.
1
2
3
plt.figure(figsize=(20, 15))
plot_tree(dt, filled=True, feature_names=['alcohol', 'sugar', 'pH'])
plt.show()

png

  • 같은 트리지만 특성값을 표준점수로 바꾸지 않았기에 이해하기 훨씬 쉽다.

    • 적어도 당도를 음수로 표기하는 것보단 보기 좋다.
  • 다음 조건을 만족하는 것이 레드 와인이다.

    • (1.625 < sugar < 4.325) AND (alcohol < 11.025) = 레드 와인
  • 특성 중요도

    • 결정 트리는 어떤 특성이 가장 유용한지 나타내는 특성 중요도를 계산해준다.
    • 이 트리의 루트 노드와 깊이 1에서 sugar를 사용했기 때문에 아마 sugar가 가장 유용한 특성 중 하나일 것이다.
    • 특성 중요도는 결정 트리 모델의 feature_importances_ 속성에 저장되어 있다.
1
print(dt.feature_importances_)
[0.12345626 0.86862934 0.0079144 ]
  • alcohol ,sugar, ph 순서이기 때문에 두 번째인 sugar의 중요도가 가장 높은 것을 알 수 있다.

  • 번외

1
2
3
4
5
6
7
8
9
10
11
12
import graphviz
from sklearn import tree

# DOT data
dot_data = tree.export_graphviz(dt, out_file=None,
feature_names = ['alcohol', 'sugar', 'pH'],
filled=True)

# Draw graph
graph = graphviz.Source(dot_data, format="png")
graph
graph.render("decision_tree_graphivz")
'decision_tree_graphivz.png'
1
2
3
4
5
6
7
8
9
10
11
12
13
14
15
from matplotlib.colors import ListedColormap, to_rgb
import numpy as np

plt.figure(figsize=(20, 15))
artists = plot_tree(dt, filled = True,
feature_names = ['alcohol', 'sugar', 'pH'])

colors = ['blue', 'red']
for artist, impurity, value in zip(artists, dt.tree_.impurity, dt.tree_.value):
r, g, b = to_rgb(colors[np.argmax(value)])
f = impurity * 2
artist.get_bbox_patch().set_facecolor((f + (1-f)*r, f + (1-f)*g, f + (1-f)*b))
artist.get_bbox_patch().set_edgecolor('black')

plt.show()

png

  • Reference : 혼자 공부하는 머신러닝 + 딥러닝

chapter_5_2

교차 검증과 그리드 서치

  • 키워드 : 하이퍼 파라미터
  • 데이터가 작을 때, 주로 사용
  • 하이퍼 파라미터
    • max_depth : 3, 정확도가 84%
  • 결론
    • 모르면 디폴트만 쓰자!
    • 가성비 (시간 대비 성능 보장 안됨!)

검증 세트

  • 테스트 세트(1회성)
  • 훈련 데이터를 훈련 데이터 + 검증 데이터로 재 분할

현실

  • 테스트 데이터가 별도로 존재하지 않음!

  • 전체 데이터 = 훈련 (6) : 검증 (2) : 테스트 (2)

    • 테스트 데이터는 모르는 데이터로 생각!
  • 캐글

    • 캐글에서는 훈련, 테스트 데이터가 제공된다. 훈련 데이터만 한 번 쪼개서 사용하면 된다.

참고

1
2
3
4
5
import pandas as pd
wine = pd.read_csv("https://bit.ly/wine_csv_data")

data = wine[['alcohol', 'sugar', 'pH']].to_numpy()
target = wine['class'].to_numpy()
1
2
3
4
5
from sklearn.model_selection import train_test_split

train_input, test_input, train_target, test_target = train_test_split(
data, target, test_size=0.2, random_state=42
)
1
2
3
sub_input, val_input, sub_target, val_target = train_test_split(
train_input, train_target, test_size=0.2, random_state=42
)

모델 만든 후 평가

1
2
3
4
5
from sklearn.tree import DecisionTreeClassifier
dt = DecisionTreeClassifier(random_state=42)
dt.fit(sub_input, sub_target)
print(dt.score(sub_input, sub_target))
print(dt.score(val_input, val_target))
0.9971133028626413
0.864423076923077

교차 검증

  • 많이 하면 많이 할수록 좋다.
  • 교차 검증의 목적 : 좋은 모델이 만들어진다!
    • 좋은 모델 != 성능 좋은 모델
    • 좋은 모델 = 과대 적합이 아닌 모델 = 모형의 오차가 적은 모델 = 안정적인 모델
  • 교재 245p
    • 모델 평가 1 : 90%
    • 모델 평가 2 : 85%
    • 모델 평가 3 : 80%
  • 단점 : 시간이 오래 걸림

교차 검증 함수

1
2
3
from sklearn.model_selection import cross_validate
scores = cross_validate(dt, train_input, train_target)
print(scores)
{'fit_time': array([0.01164412, 0.00772762, 0.00744891, 0.00796771, 0.00716805]), 'score_time': array([0.00128865, 0.00070405, 0.0007143 , 0.00097823, 0.00069904]), 'test_score': array([0.86923077, 0.84615385, 0.87680462, 0.84889317, 0.83541867])}
  • 최종점수 평균 구하기
1
2
import numpy as np
print(np.mean(scores['test_score']))
0.855300214703487
  • 훈련 세트 섞은 후, 10-폴드 교차검증
1
2
3
4
5
from sklearn.model_selection import StratifiedKFold
splitter = StratifiedKFold(n_splits = 10, shuffle = True, random_state=42)
scores = cross_validate(dt, train_input, train_target, cv = splitter)

print(np.mean(scores['test_score']))
0.8574181117533719

하이퍼 파라미터 튜닝 꼭 하고 싶다!

  • 랜덤 서치 사용하자!
    • 그리드 서치보다 편리하다
  • 자동으로 잡아주는 라이브러리들이 등장하기 시작함
    • hyperopt
1
2
3
4
5
6
7
8
9
%%time

from sklearn.model_selection import GridSearchCV
params = {
'min_impurity_decrease' : [0.0001, 0.0002, 0.0003, 0.0004, 0.0005],
}
# dt = DecisionTreeClassifier(random_state=42)
gs = GridSearchCV(DecisionTreeClassifier(random_state=42), params, n_jobs=-1)
gs.fit(train_input, train_target)
CPU times: user 83.8 ms, sys: 1.66 ms, total: 85.5 ms
Wall time: 264 ms
  • pamas에 2줄을 쓰면 시간이 2배 이상 더 걸린다.
1
2
3
4
5
6
7
8
9
10
%%time

from sklearn.model_selection import GridSearchCV
params = {
'min_impurity_decrease' : [0.0001, 0.0002, 0.0003, 0.0004, 0.0005],
'max_depth' : [3, 4, 5, 6, 7]
}
# dt = DecisionTreeClassifier(random_state=42)
gs = GridSearchCV(DecisionTreeClassifier(random_state=42), params, n_jobs=-1)
gs.fit(train_input, train_target)
CPU times: user 191 ms, sys: 1.13 ms, total: 192 ms
Wall time: 674 ms
1
2
3
4
5
6
7
8
9
10
11
12
13
14
15
%%time

from sklearn.model_selection import GridSearchCV
params = {
'min_impurity_decrease' : [0.0001, 0.0002, 0.0003, 0.0004, 0.0005],
'max_depth' : [3, 4, 5, 6, 7]
}
# dt = DecisionTreeClassifier(random_state=42)
gs = GridSearchCV(DecisionTreeClassifier(random_state=42), params, n_jobs=-1)
gs.fit(train_input, train_target)

dt = gs.best_estimator_
print(dt)
print(dt.score(train_input, train_target))
print(gs.best_params_)
DecisionTreeClassifier(max_depth=7, min_impurity_decrease=0.0005,
                       random_state=42)
0.8830094285164518
{'max_depth': 7, 'min_impurity_decrease': 0.0005}
CPU times: user 284 ms, sys: 38.7 ms, total: 323 ms
Wall time: 2.15 s
  • 이 부분에 의해 결과가 (5x5=)25개 출력된다.
    • ‘min_impurity_decrease’ : [0.0001, 0.0002, 0.0003, 0.0004, 0.0005]
    • ‘max_depth’ : [3, 4, 5, 6, 7]
1
print(gs.cv_results_['mean_test_score'])
[0.84125583 0.84125583 0.84125583 0.84125583 0.84125583 0.85337806
 0.85337806 0.85337806 0.85337806 0.85318557 0.85780355 0.85799604
 0.85857352 0.85857352 0.85838102 0.85645721 0.85799678 0.85876675
 0.85972866 0.86088306 0.85607093 0.85761031 0.85799511 0.85991893
 0.86280466]

랜덤 서치

  • p252. 매개변수 값의목록을 전달하는 것이 아니라 매개변수를 샘플링할 수 있도록 확률 분포 객체를 전달.
1
2
3
from scipy.stats import uniform, randint
rgen = randint(0, 10)
rgen.rvs(10)
array([7, 9, 7, 4, 2, 0, 4, 8, 6, 3])
1
np.unique(rgen.rvs(1000), return_counts = True)
(array([0, 1, 2, 3, 4, 5, 6, 7, 8, 9]),
 array([103,  90,  88, 110,  84, 115, 105, 102, 104,  99]))
  • 254p
1
2
3
4
5
6
7
8
9
10
11
from sklearn.model_selection import RandomizedSearchCV

params = {
'min_impurity_decrease' : uniform(0.0001, 0.001),
'max_depth' : randint(20,50)
}

gs = RandomizedSearchCV(DecisionTreeClassifier(random_state=42),
params, n_iter = 100, n_jobs = -1, random_state=42)

gs.fit(train_input, train_target)
RandomizedSearchCV(estimator=DecisionTreeClassifier(random_state=42),
                   n_iter=100, n_jobs=-1,
                   param_distributions={'max_depth': <scipy.stats._distn_infrastructure.rv_frozen object at 0x7fa6910bdd90>,
                                        'min_impurity_decrease': <scipy.stats._distn_infrastructure.rv_frozen object at 0x7fa6907f3810>},
                   random_state=42)
  • 위 parmas에 정의된 매개변수 범위에서 총 100번(n_iter 매개변수)을 샘플링하여 교차 검증을 수행하고 최적의 매개변수 조합을 찾는다.
  • 앞서 그리드 서치보다 훨씬 교차 검증 수를 줄이면서 넓은 영역을 효과적으로 탐색할 수 있다.
  • 결과를 확인해보자. 먼저 최적의 매개변수 조합을 출력한다.
1
print(gs.best_params_)
{'max_depth': 29, 'min_impurity_decrease': 0.000437615171403628}
  • 최고의 교차 검증 점수도 확인한다.
1
print(np.max(gs.cv_results_['mean_test_score']))
0.8689635004071962
  • 최적의 모델은 이미 전체 훈련 세트(train_input, train_target)로 훈련되어 best_estimator_속성에 저장되어 있다.
  • 이 모델을 최종 모델로 결정하고 테스트 세트의 성능을 확인해 보자
1
2
dt = gs.best_estimator_
print(dt.score(test_input, test_target))
0.8638461538461538
  • 테스트 세트 점수는 검증 세트에 대한 점수보다 조금 작은 것이 일반적이다.

  • 여기까지 두 서치를 사용해 본 결과, 랜덤 서치가 더 사용하기 용이하였다.

  • Reference : 혼자 공부하는 머신러닝 + 딥러닝

chapter4_2

확률적 경사 하강법

  • 1차 가장 큰 차이 (기존 ML모형)

    • 샘플링 방식이 달라짐
    • 샘플링을 좀 더 세분화함
  • 2차 가장 큰 차이

    • 오차를 보정 (200p~201p)
      • 기울기 보정이다.
        • 미분으로 기울기(경사)를 구한다.
        • 기울기가 0에 가까워질 때까지 반복한다.
  • 경사하강법이 쓰인 여러 알고리즘

    • (이미지, 텍스트) 딥러닝 기초 알고리즘
    • 트리 알고리즘 + 경사하강법 융햡 = 부스팅 계열
      • : 대표 알고리즘 : LightGBM, Xgboost, Catboost
      • : 1등으로 자주 쓰인 알고리즘 = lightGBM, Xgboost
      • : 하이퍼 파라미터의 개수가 80개 넘음
  • 머신러닝의 목적 : 오차를 줄이는 것

    • 오차 = 손실(Cost)
  • 손실 함수(loss function)

    • 손실(Cost) = 오차

SGDClassifier

  • 확률적 경사하강법 분류기
1
2
3
import pandas as pd 
fish = pd.read_csv("https://bit.ly/fish_csv_data")
fish.info()
<class 'pandas.core.frame.DataFrame'>
RangeIndex: 159 entries, 0 to 158
Data columns (total 6 columns):
 #   Column    Non-Null Count  Dtype  
---  ------    --------------  -----  
 0   Species   159 non-null    object 
 1   Weight    159 non-null    float64
 2   Length    159 non-null    float64
 3   Diagonal  159 non-null    float64
 4   Height    159 non-null    float64
 5   Width     159 non-null    float64
dtypes: float64(5), object(1)
memory usage: 7.6+ KB
  • 배열로 변환하는 코드
    • 독립변수 = fish_input
    • 종속변수 = fish_target
1
2
fish_input = fish[['Weight', 'Length', 'Diagonal', 'Height', 'Width']]  # Diagonal = 대각선
fish_target = fish['Species'].to_numpy()
  • 훈련 데이터와 테스트 데이터
    • 이제 데이터를 훈련 세트와 테스트 세트로 나눈다.
    • 외워야 할 정도로 중요. 자주 쓰다보면 외워진다.
1
2
3
4
5
from sklearn.model_selection import train_test_split
train_input, test_input, train_target, test_target = train_test_split(
fish_input, fish_target, random_state = 42
)
train_input.shape, test_input.shape, train_target.shape, test_target.shape
((119, 5), (40, 5), (119,), (40,))
  • 표준화 처리
    • 다시 한 번 강조하지만 꼭 훈련 세트에서 학습한 통계값으로 테스트 세트도 변환한다.
    • 키워드 : Data Leakage 방지
    • 데이터 분석 희망자! 필수 공부!
1
2
3
4
5
6
7
8
from sklearn.preprocessing import StandardScaler
ss = StandardScaler()
ss.fit(train_input)

# ss 훈련데이터만 활용해서 학습(?)이 끝난 상태
# 표준화 처리를 훈련데이터와 테스트데이터에 동시 적용
train_scaled = ss.transform(train_input)
test_scaled = ss.transform(test_input)

모델 학습

  • 2개의 매개 변수 지정
  • loss = “log” = 로지스틱 손실 함수로 지정
  • max_iter = 에포크 횟수 지정
1
2
3
4
5
6
7
8
9
10
11
12
13
14
from sklearn.linear_model import SGDClassifier

# 매개변수 지정
# 하이퍼파라미터 설정
## 매개변수 값을 dictionary 형태로 추가하는 코드 작성 가능
## 강사는 입문자들에게는 비추천
sc = SGDClassifier(loss = "log", max_iter = 40, random_state=42)\

# 모형학습
sc.fit(train_scaled, train_target)

# 스코어 확인 (정확도)
print(sc.score(train_scaled, train_target))
print(sc.score(test_scaled, test_target))
0.8571428571428571
0.8
  • 에포크
    • 최적의 기울기를 찾아야 한다.
    • 적절한 에포크 숫자를 찾자
1
2
3
4
5
6
7
8
9
10
11
12
13
14
import numpy as np
sc = SGDClassifier(loss= "log", random_state=42)
train_score=[]
test_score=[]
classes = np.unique(train_target)

for _ in range(0,300):
sc.partial_fit(train_scaled, train_target, classes=classes)
train_score.append(sc.score(train_scaled, train_target))
test_score.append(sc.score(test_scaled, test_target))

# 정확도
print(train_score[:5])
print(test_score[:5])
[0.5294117647058824, 0.6218487394957983, 0.6386554621848739, 0.7310924369747899, 0.7226890756302521]
[0.65, 0.55, 0.575, 0.7, 0.7]
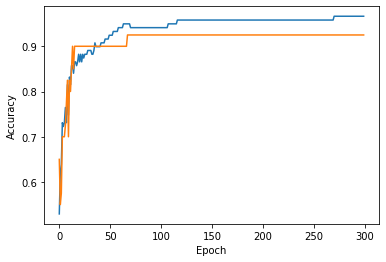
  • 모형 학습 시각화
1
2
3
4
5
6
7
8
import matplotlib.pyplot as plt

fig, ax = plt.subplots()
ax.plot(train_score) # 푸른색
ax.plot(test_score) # 주황색
ax.set_xlabel("Epoch")
ax.set_ylabel("Accuracy")
plt.show()

png

  • 위 결과 25쯤에서 과소적합.

  • 위 결과 125쯤에서 과대적합.

  • 이 모델의 경우 100번째 Epoch가 적절한 반복 횟수로 보인다.

  • 그럼 SGDClassifier의 반복 횟루를 100에 맞추고 모델을 다시 훈련한다.

  • 그리고 최종적으로 훈련 세트와 테스트 세트에서 점수를 출련한다.

1
2
3
4
5
sc = SGDClassifier(loss = 'log', max_iter=100, tol=None, random_state=42)
sc.fit(train_scaled, train_target)

print(sc.score(train_scaled, train_target))
print(sc.score(test_scaled, test_target))
0.957983193277311
0.925
  • SGDClassifier는 일정 에포크 동안 성능이 향상되지 않으면 더 훈련하지 않고 자동으로 멈춘다.

  • tol 매개변수에서 향상될 최솟값을 지정한다.

  • 앞의 코드에서는 tol매개변수를 None으로 지정하여 자동으로 멈추지 않고 max_iter=100 만큼 무조건 반복하도록 했다.

  • 결과적으로 점수가 높게 나왔다.

  • 확률적 경사 하강법을 사용한 생선 분류 문제를 성공적으로 수행했다.

  • loss 매개변수

    • SGDClassifier의 매개변수이다.
    • loss 매개변수의 기본값은 ‘hinge’이다.
    • ‘힌지 손실’은 ‘서포트 벡터 머신’ 이라 불리는 또 다른 머신러닝 알고리즘을 위한 손실 함수이다.
    • 한 마디로 loss 매개변수는 여러 알고리즘에서 쓰이는 매개변수이다.
  • loss 매개변수와 힌지 손실 예시

    • 간단한 예로 힌지 손실을 사용해 같은 반복 횟수 동안 모델을 훈련해보자.
1
2
3
4
sc = SGDClassifier(loss='hinge', max_iter=100, tol=None, random_state=42)
sc.fit(train_scaled, train_target)
print(sc.score(train_scaled, train_target))
print(sc.score(test_scaled, test_target))
0.9495798319327731
0.925

전체 소스 코드

1
2
3
4
5
6
7
8
9
10
11
12
13
14
15
16
17
18
19
20
21
22
23
24
25
26
27
28
29
30
31
32
33
34
35
36
37
38
39
40
41
42
43
44
45
46
47
48
49
50
51
52
53
54
55
56
57
58
59
60
61
62
63
64
65
66
67
68
69
70
71
72
73
74
75
76
77
78
79
80
81
82
83
# 확률적 경사 하강법

# SGDClassifier

import pandas as pd
fish = pd.read_csv("https://bit.ly/fish_csv_data")

fish_input = fish[['Weight', 'Length', 'Diagonal', 'Height', 'Width']] # Diagonal = 대각선
fish_target = fish['Species'].to_numpy()

from sklearn.model_selection import train_test_split
train_input, test_input, train_target, test_target = train_test_split(
fish_input, fish_target, random_state = 42
)

from sklearn.preprocessing import StandardScaler
ss = StandardScaler()
ss.fit(train_input)

# ss 훈련데이터만 활용해서 학습(?)이 끝난 상태
# 표준화 처리를 훈련데이터와 테스트데이터에 동시 적용
train_scaled = ss.transform(train_input)
test_scaled = ss.transform(test_input)

from sklearn.linear_model import SGDClassifier

# 매개변수 지정
# 하이퍼파라미터 설정
## 매개변수 값을 dictionary 형태로 추가하는 코드 작성 가능
## 강사는 입문자들에게는 비추천
sc = SGDClassifier(loss = "log", max_iter = 40, random_state=42)\

# 모형학습
sc.fit(train_scaled, train_target)

# 스코어 확인 (정확도)
print(sc.score(train_scaled, train_target))
print(sc.score(test_scaled, test_target))

sc = SGDClassifier(loss = 'log', max_iter=100, tol=None, random_state=42)
sc.fit(train_scaled, train_target)
print(sc.score(train_scaled, train_target))
print(sc.score(test_scaled, test_target))

sc.partial_fit(train_scaled, train_target)
print(sc.score(train_scaled, train_target))
print(sc.score(test_scaled, test_target))

# 에포크와 과대/과소적합

import numpy as np
sc = SGDClassifier(loss= "log", random_state=42)
train_score=[]
test_score=[]
classes = np.unique(train_target)

for _ in range(0,300):
sc.partial_fit(train_scaled, train_target, classes=classes)
train_score.append(sc.score(train_scaled, train_target))
test_score.append(sc.score(test_scaled, test_target))

# 정확도
print(train_score[:5])
print(test_score[:5])

import matplotlib.pyplot as plt

fig, ax = plt.subplots()
ax.plot(train_score) # 푸른색
ax.plot(test_score) # 주황색
ax.set_xlabel("Epoch")
ax.set_ylabel("Accuracy")
plt.show()

sc = SGDClassifier(loss = 'log', max_iter=100, tol=None, random_state=42)
sc.fit(train_scaled, train_target)
print(sc.score(train_scaled, train_target))
print(sc.score(test_scaled, test_target))

sc = SGDClassifier(loss='hinge', max_iter=100, tol=None, random_state=42)
sc.fit(train_scaled, train_target)
print(sc.score(train_scaled, train_target))
print(sc.score(test_scaled, test_target))
0.8571428571428571
0.8
0.957983193277311
0.925
0.9411764705882353
0.925
[0.5294117647058824, 0.6218487394957983, 0.6386554621848739, 0.7310924369747899, 0.7226890756302521]
[0.65, 0.55, 0.575, 0.7, 0.7]

png

0.957983193277311
0.925
0.9495798319327731
0.925
  • Reference : 혼자 공부하는 머신러닝 + 딥러닝
chapter4_1

로지스틱 회귀

  • 대상이 어떤 타깃에 속할 확률을 구한다.

데이터 불러오기

  • 컬럼 설명 177p 그림
1
2
3
4
import pandas as pd

fish = pd.read_csv('https://bit.ly/fish_csv_data')
fish.head()

Species Weight Length Diagonal Height Width
0 Bream 242.0 25.4 30.0 11.5200 4.0200
1 Bream 290.0 26.3 31.2 12.4800 4.3056
2 Bream 340.0 26.5 31.1 12.3778 4.6961
3 Bream 363.0 29.0 33.5 12.7300 4.4555
4 Bream 430.0 29.0 34.0 12.4440 5.1340

  <script>
    const buttonEl =
      document.querySelector('#df-3c5195bb-ad65-485c-8b95-563887f303f2 button.colab-df-convert');
    buttonEl.style.display =
      google.colab.kernel.accessAllowed ? 'block' : 'none';

    async function convertToInteractive(key) {
      const element = document.querySelector('#df-3c5195bb-ad65-485c-8b95-563887f303f2');
      const dataTable =
        await google.colab.kernel.invokeFunction('convertToInteractive',
                                                 [key], {});
      if (!dataTable) return;

      const docLinkHtml = 'Like what you see? Visit the ' +
        '<a target="_blank" href=https://colab.research.google.com/notebooks/data_table.ipynb>data table notebook</a>'
        + ' to learn more about interactive tables.';
      element.innerHTML = '';
      dataTable['output_type'] = 'display_data';
      await google.colab.output.renderOutput(dataTable, element);
      const docLink = document.createElement('div');
      docLink.innerHTML = docLinkHtml;
      element.appendChild(docLink);
    }
  </script>
</div>
  • unique()
    • 어떤 종류의 생선이 있는지 species 열에서 고유한 값을 추출한다.
1
print(pd.unique(fish['Species']))
['Bream' 'Roach' 'Whitefish' 'Parkki' 'Perch' 'Pike' 'Smelt']

데이터 변환

  • 배열로 변환
1
2
fish_input = fish[['Weight', 'Length', 'Diagonal', 'Height', 'Width']]  # Diagonal = 대각선
fish_input.shape
(159, 5)
  • target 배열로 변환
  • 종속변수
1
fish_target = fish['Species'].to_numpy()

훈련 데이터와 테스트 데이터

  • 이제 데이터를 훈련 세트와 테스트 세트로 나눈다.
  • 외워야 할 정도로 중요. 자주 쓰다보면 외워진다.
1
2
3
4
from sklearn.model_selection import train_test_split
train_input, test_input, train_target, test_target = train_test_split(
fish_input, fish_target, random_state = 42
)
  • 표준화 전처리
    • 이유가 중요하다
    • 사이킷런의 StandardScaler 클래스를 사용해 훈련 세트와 테스트 세트를 표준화 전처리한다.
    • 반드시 훈련 세트의 통계값으로 테스트 세트를 변환해야 한다.
1
2
3
4
5
6
from sklearn.preprocessing import StandardScaler
ss = StandardScaler()
ss.fit(train_input)

train_scaled = ss.transform(train_input)
test_scaled = ss.transform(test_input)
1
2
print(train_input[:5])
print(train_scaled[:5])
     Weight  Length  Diagonal   Height   Width
26    720.0    35.0      40.6  16.3618  6.0900
137   500.0    45.0      48.0   6.9600  4.8960
146     7.5    10.5      11.6   1.9720  1.1600
90    110.0    22.0      23.5   5.5225  3.9950
66    140.0    20.7      23.2   8.5376  3.2944
[[ 0.91965782  0.60943175  0.81041221  1.85194896  1.00075672]
 [ 0.30041219  1.54653445  1.45316551 -0.46981663  0.27291745]
 [-1.0858536  -1.68646987 -1.70848587 -1.70159849 -2.0044758 ]
 [-0.79734143 -0.60880176 -0.67486907 -0.82480589 -0.27631471]
 [-0.71289885 -0.73062511 -0.70092664 -0.0802298  -0.7033869 ]]

k-최근접 이웃 분류기의 확률 예측

  • 필요한 데이터를 모두 준비했다.
  • 이제 k-최근접 이웃 분류기로 테스트 세트에 들어 있느 확률을 예측한다.
1
2
3
4
5
6
7
from sklearn.neighbors import KNeighborsClassifier

kn = KNeighborsClassifier(n_neighbors=3) # 최근접 이웃 개수를 3으로 지정
kn.fit(train_scaled, train_target)

print(kn.score(train_scaled, train_target))
print(kn.score(test_scaled, test_target))
0.8907563025210085
0.85
  • 182p

  • 다중 분류( multi-class classification)

    • 앞서 fish 데이터프레임에서 7종류의 생선이 있었다.
    • fish[‘Species’]를 사용해 타깃 데이터를 만들었기에 두 세트의 타깃 데이터에도 7개의 생선 종류가 들어가 있다.
    • 이렇게 타깃 데이터에 2개 이상의 클래스가 포함된 문제를 ‘다중 분류’라 부른다.
1
2
3
4
5
6
7
8
9
10
import numpy as np

# predict_proba() 메서드로 클래스별 확률 값을 반환한다.
proba = kn.predict_proba(test_scaled[:5])

# round()함수. 소수점 네번째 자리로 반올림
print(np.round(proba, decimals = 4))

# 타깃값을 그대로 사이킷런 모델에 전달하면 순서가 알파벨 순으로 매겨진다.
print(kn.classes_)
[[0.     0.     1.     0.     0.     0.     0.    ]
 [0.     0.     0.     0.     0.     1.     0.    ]
 [0.     0.     0.     1.     0.     0.     0.    ]
 [0.     0.     0.6667 0.     0.3333 0.     0.    ]
 [0.     0.     0.6667 0.     0.3333 0.     0.    ]]
['Bream' 'Parkki' 'Perch' 'Pike' 'Roach' 'Smelt' 'Whitefish']
  • 위 코드의 결과는 어떤 물고기일지에 대한 확률이다.
    • 예를 들어, 1번째 샘플은 100% 확률로 perch이다.
    • 에를 들어, 4번째 샘플은 66% 확률로 perch이고, 33% 확률로 Roach이다.

로지스틱 회귀

  • 중요도 : 최상

  • 오늘 유튜브 영상 반드시 시청

    • 개념 재복습 반드시 필요
  • Why?

    • 로지스틱 회귀
      • 기초 통계로도 활용 (의학통계)
      • 머신러닝 부류모형의 기초 모형인데, 성능이 생각보다 나쁘지 않음
        • 데이터셋, 수치 테이터 기반
      • 딥러닝 : 초기모형에 해당됨.
  • 이름은 회귀이지만 분류 모델이다.

  • 선형 회귀와 동일하게 선형 방정식을 학습한다.

    • 예를 들어 다음과 같다.
      • z = a x (weight) + b x (length) + c x (Diagonal) + d x (Height) + e x (width) + f
      • 여기에서 a, b, c, d, e는 가중치 혹은 계수이다.
      • z 가 확률이 되려면 0~1 사이의 값이어야 한다.
      • 이를 위해 사용하는 것이 시그모이드 함수( 또는 로지스틱 함수)이다.
  • 1 / ( 1 + e^(-z) )

    • 이 식이 로지스틱 함수( 시그모이드 함수) 이다.
  • 넘파이를 사용하여 z의 그래프를 그려보자.

    • -5와 5 사이에서 0.1 간격으로 배열 z를 만든 다음 z 위치마다 로지스틱 함수를 계산한다.
    • 함수 계산은 np.exp() 함수를 사용한다.
1
2
3
4
5
6
7
8
9
10
11
import numpy as np
import matplotlib.pyplot as plt
z = np.arange(-5, 5, 0.1)
phi = 1 / (1 + np.exp(-z)) # exp는 거듭제곱, z는 범위 표시
# print(z)
# print(phi)

plt.plot(z, phi) # 문서를 봐야 함
plt.xlabel('z')
plt.ylabel('phi')
plt.show()

png

  • 개발자 취업을 원한다면

    • 공부 별도로 하지 않는다!
    • 다만 알고리즘의 컨셉은 이해해야 한다.
    • 얘기가 서로 통해야 하기 때문에
  • 데이터 분석 관련 지망이라면

    • 공부해야 한다.

로지스틱 회귀로 이진 분류 수행하기

  • 사이킷런에는 로지스틱 회귀모델인 LogisticRegression 클래스가 준비되어 있다.

  • 이진 분류이 경우

    • 로지스틱 함수의 출력이 0.5보다 크면 양성 클래스
    • 로지스틱 함수의 출력이 0.5보다 작으면 음성 클래스
  • 불리언 인덱싱 (boolean indexing)

    • 넘파일 배열은 True, False 값을 전달하여 행을 선택할 수 있다.
    • 이를 불리언 인덱싱이라고 부른다.
1
2
char_arr = np.array(['A', 'B', 'C', 'D', 'E'])
print(char_arr[[True, False, True, False, False]])
['A' 'C']
  • A 와 C만 True이므로 위 결과가 나온다.
  • 이와 같은 방식으로 훈련 세트에서 도미(bream)와 빙어(smelt)의 행만 골라낸다.
  • 비교 연산자를 사용하면 도미와 빙어의 행을 True로 만들 수 있다.
1
2
3
4
# OR 연산자(|) 를 사용하여 비교 결과를 합친다.
bream_smelt_indexes = (train_target == 'Bream') | (train_target == 'Smelt')
train_bream_smelt = train_scaled[bream_smelt_indexes]
target_bream_smelt = train_target[bream_smelt_indexes]
  • 위에서 bream_smelt_indexes 배열은 도미와 빙어일 경우만 True값이 들어간다.

  • 이 배열을 사용해 train_scaled와 train_targt 배열에 불리언 인덱싱을 적용하여 도미와 빙어 데이터만 골라낼 수 있다.

  • 186p

  • 모형 만들고 예측하기!

  • 이제 이 데이터로 로지스틱 회귀 모델을 훈련한다.

1
2
3
4
from sklearn.linear_model import LogisticRegression
lr = LogisticRegression()
# 독립변수 종속변수
lr.fit(train_bream_smelt, target_bream_smelt)
LogisticRegression()
  • 훈련한 모델을 사용해 train_bream_smelt에 있는 처음 5개 샘플을 예측한다.
1
2
3
4
# 예측하기
# 클래스로 분류
# 확률값 -> 0.5
print(lr.predict(train_bream_smelt[:5]))
['Bream' 'Smelt' 'Bream' 'Bream' 'Bream']
  • 2 번째 샘플을 제외하고 모두 도미로 예측했다.
  • 예측 확률은 predict_proba() 메서드에서 제공한다.
  • 처음 5개 샘플의 예측 확률을 출력해 본다.
1
2
print(lr.predict_proba(train_bream_smelt[:5]))  # predict_proba에서 예측 확률 제공
print(lr.classes_)
[[0.99759855 0.00240145]
 [0.02735183 0.97264817]
 [0.99486072 0.00513928]
 [0.98584202 0.01415798]
 [0.99767269 0.00232731]]
['Bream' 'Smelt']
  • 위에서 첫번째 열이 음성 클래스(0)에 대한 확률이다.

  • 위에서 두번째 열이 양성 클래스(1)에 대한 확률이다.

  • bream이 음성이고, smelt가 양성 클래스이다.

  • 이진 분류를 수행 완료했다.

  • 이제 선형 회귀에서터럼 로지스틱 회귀가 학습한 계수를 확인한다.

  • 방정식의 각 기울기와 상수를 구하는 코드

1
print(lr.coef_, lr.intercept_)
[[-0.4037798  -0.57620209 -0.66280298 -1.01290277 -0.73168947]] [-2.16155132]
  • 이 로지스틱 회귀 모델이 학습한 방정식은 다음과 같다.

    • z = -0.404 x (weight) -0.576 x (length) -0.663 x (Diagonal) -1.103 x (Height) -0.732 x (width) -2.161
    • 확실히 로지스틱 회귀는 선형 회귀와 비슷하다.
  • LogistricRegression 모델로 z값을 계산해 보자.

  • z식

  • z값을 출력하자.

1
2
decisions = lr.decision_function(train_bream_smelt[:5])
print(decisions)
[-6.02927744  3.57123907 -5.26568906 -4.24321775 -6.0607117 ]
  • 이 z값을 로지스틱 함수에 통과시키면 확률을 얻을 수 있다.
  • expit() 함수를 이용해 편하게 계산 가능하다.
  • 이 함수를 이용해 decisions 배열의 값을 확률로 변환한다.
1
2
from scipy.special import expit
print(expit(decisions))
[0.00240145 0.97264817 0.00513928 0.01415798 0.00232731]
  • 양성 클래스에 대한 z값을 반환했다.

  • 지금까지 이진 분류를 통해 2종류의 생선 샘플을 골라냈고 이를 이용해 로지스틱 회귀 모델을 훈련했다.

  • 188p

  • Reference : 혼자 공부하는 머신러닝 + 딥러닝

chapter3_3

특성 공학과 규제

  • 선형 회귀는 특성이 많을수록 효과가 좋아진다.
    • 무게와 길이뿐만 아니라 높이와 두께도 활용해보자.
    • 사이킷런의 PolynomialFeatures 클래스를 사용한다.

포인트

  • 모델에 규제를 추가함
    • 모형의 과대적합을 방지하기 위해!
      • 훈련 데이터는 예측 성능이 좋고! 테스트 데이터는 예측성능이 떨어지는 현상
    • 릿지, 라쏘 회귀 (중요도 하)
  • 하이퍼 파라미터 (개념 이해 중요!)
    • 머신러닝 모델이 학습할수 없고 사람이 알려줘야 하는 파라미터 (161p 참고)
    • 실무에서는 그렇게 큰 의미가 없음
    • 이유 : 가성비가 떨어짐 (작업시간 대비 성능 보장이 안 됨)

하이퍼 파라미터

  • 기본 모델에서 과대적합이 발생함
  • 모델의 성능을 높여주기 위해 여러 옵션을 선택 및 값 조정
    • 문제 : 항상 선응이 보장이 안됨
    • 모델마다 하이퍼 파라미터 새팅하는 방법이 다 다름 (종류가 제 각각)
    • scikit-learn 라이브러리 내 모델의 갯수가 103개
    • 어떤 모델은 하이퍼 파라미터 새팅 위해 필요한 매개 변수가 1개인 경우도 있음
    • 어떤 모델은 하이퍼 파라미터의 매개변수가 80개가 넘어가는 것도 있음
      • 하이퍼 파라미터 기존에 세팅되어 있는대로 사용 권유 (조건: 그 모델에 잘 모르면!!)

다중 회귀 (multiple regression)

  • 여러 개의 특성을 사용한 선형 회귀를 다중 회귀라고 부른다.

특성 공학(feagure engineering)

  • 기존의 각 특성을 서로 곱해서 또 다른 특성을 만들 수 있다.
  • 예를 들어, ‘농어 길이 x 농어 높이’를 새로운 특성으로 삼을 수 있다.
  • 이렇게 기존의 특성을 사용해 새로운 특성을 뽑아내는 작업을 특성 공학이라고 부른다.

데이터 준비

  • 이전과 달리 농어의 특성 3개를 사용한다.

  • 판다스를 이용하여 간편하게 데이터를 입력한다.

  • 판다스(pandas)는 데이터 분석 라이브러리이다.

  • 데이터프레임(dataframe)은 판다스의 핵심 데이터 구조이다.

  • 판다스 데이터 프레임을 만들기 위해 많이 사용하는 파일은 CSV 파일이다.

  • 다음 주소와 read_csv()함수로 파일을 읽어낸다. :https://bit.ly/perch_csv_data

  • read_csv() 함수로 데이터프레임을 만든 다음 to_numpy() 메서드를 사용해 넘파이 배열로 바꾼다.

1
2
3
4
import pandas as pd   # pd는 관례적으로 사용하는 판다스의 별칭이다.
df = pd.read_csv('https://bit.ly/perch_csv_data')
perch_full = df.to_numpy()
print(perch_full)
[[ 8.4   2.11  1.41]
 [13.7   3.53  2.  ]
 [15.    3.82  2.43]
 [16.2   4.59  2.63]
 [17.4   4.59  2.94]
 [18.    5.22  3.32]
 [18.7   5.2   3.12]
 [19.    5.64  3.05]
 [19.6   5.14  3.04]
 [20.    5.08  2.77]
 [21.    5.69  3.56]
 [21.    5.92  3.31]
 [21.    5.69  3.67]
 [21.3   6.38  3.53]
 [22.    6.11  3.41]
 [22.    5.64  3.52]
 [22.    6.11  3.52]
 [22.    5.88  3.52]
 [22.    5.52  4.  ]
 [22.5   5.86  3.62]
 [22.5   6.79  3.62]
 [22.7   5.95  3.63]
 [23.    5.22  3.63]
 [23.5   6.28  3.72]
 [24.    7.29  3.72]
 [24.    6.38  3.82]
 [24.6   6.73  4.17]
 [25.    6.44  3.68]
 [25.6   6.56  4.24]
 [26.5   7.17  4.14]
 [27.3   8.32  5.14]
 [27.5   7.17  4.34]
 [27.5   7.05  4.34]
 [27.5   7.28  4.57]
 [28.    7.82  4.2 ]
 [28.7   7.59  4.64]
 [30.    7.62  4.77]
 [32.8  10.03  6.02]
 [34.5  10.26  6.39]
 [35.   11.49  7.8 ]
 [36.5  10.88  6.86]
 [36.   10.61  6.74]
 [37.   10.84  6.26]
 [37.   10.57  6.37]
 [39.   11.14  7.49]
 [39.   11.14  6.  ]
 [39.   12.43  7.35]
 [40.   11.93  7.11]
 [40.   11.73  7.22]
 [40.   12.38  7.46]
 [40.   11.14  6.63]
 [42.   12.8   6.87]
 [43.   11.93  7.28]
 [43.   12.51  7.42]
 [43.5  12.6   8.14]
 [44.   12.49  7.6 ]]
  • 타깃 데이터는 이전과 동일한 방식으로 준비한다.
1
2
3
4
5
6
7
8
9
10
11
import numpy as np

perch_weight = np.array(
[5.9, 32.0, 40.0, 51.5, 70.0, 100.0, 78.0, 80.0, 85.0, 85.0,
110.0, 115.0, 125.0, 130.0, 120.0, 120.0, 130.0, 135.0, 110.0,
130.0, 150.0, 145.0, 150.0, 170.0, 225.0, 145.0, 188.0, 180.0,
197.0, 218.0, 300.0, 260.0, 265.0, 250.0, 250.0, 300.0, 320.0,
514.0, 556.0, 840.0, 685.0, 700.0, 700.0, 690.0, 900.0, 650.0,
820.0, 850.0, 900.0, 1015.0, 820.0, 1100.0, 1000.0, 1100.0,
1000.0, 1000.0]
)
  • 그 다음 perch_full과 perch_weight를 훈련 세트와 테스트 세트로 나눈다.
1
2
3
4
5
6
7
from sklearn.model_selection import train_test_split

train_input, test_input, train_target, test_target = train_test_split(
perch_full, perch_weight, random_state = 42
)

#train_input.shape, test_input.shape, train_target.shape, test_target.shape
  • 이 데이터를 사용해 새로운 특성을 만든다.

사이킷런의 변환기

  • 사이킷런은 특성을 만들거나 전처리하기 위한 다양한 클래스를 제공한다.

  • 이런 클래스를 변환기(transformer)라고 부른다.

  • 사이킷런의 모델 클래스에 일관된 fit(), score(), predict() 메서드가 있는 것처럼 변환기 클래스는 모두 fit(), transform()메서드를 제공한다

  • 사용할 변환기는 PolynomialFeatures 클래스이다.

  • 이 클래스는 sklearn.preprocessing패키지에 포함되어 있다.

1
from sklearn.preprocessing import PolynomialFeatures
  • 2개의 특성 2와 3으로 이루어진 샘플 하나를 적용해본다.
  • 이 클래스의 객체를 만르고 fit(), transform() 메서드를 차례대로 호출한다.
1
2
3
poly = PolynomialFeatures()
poly.fit([[2, 3]])
print(poly.transform([[2, 3]]))
[[1. 2. 3. 4. 6. 9.]]
  • fit()

    • 새롭게 만들 특성 조합을 찾는다.
  • transform()

    • 실제로 데이터를 변환한다.
  • 위 코드에서 fit()메서드에 입력데이터만 전달했다.

  • 즉 여기에서는 2개의 특성을 가진 샘플 [2,3]이 6개의 특성을 가진 샘플 [1. 2. 3. 4. 6. 9.]로 바뀌었다.

  • PolynomialFeatures 클래스는 기본적으로 각 특성을 제곱한 항을 추가하고 특성끼리 서로 곱한 항을 추가한다.

  • 2와 3을 각각 제곱한 4와 9가 추가되었고, 2와 3을 곱한 6이 추가된다. 1은 다음 식에 의해 추가된다.

  • 무게 = a x 길이 + b x 높이 + c x 두께 + d x 1

  • 이렇게 놓고 보면 특성은 (길이, 높이, 두께, 1)이 된다.

  • 하지만 사이킷런의 선형 모델은 자동으로 절편(계수)을 추가하므로 굳이 이렇게 특성을 만들 필요가 없다.

  • include_bias = False로 지정하여 다시 특성을 변환한다.

1
2
3
poly = PolynomialFeatures(include_bias=False)
poly.fit([[2, 3]])
print(poly.transform([[2, 3]]))
[[2. 3. 4. 6. 9.]]
  • 절편을 위한 항이 제거되고 특성의 제곱과 특성끼리 곱한 항만 추가되었다.
  • 이제 이 방식으로 train_input에 적용한다.
  • train_input을 변환한 데이터를 train_poly에 저장하고 이 배열의 크기를 확인해 보자.
1
2
3
4
poly = PolynomialFeatures(include_bias=False)
poly.fit(train_input)
train_poly = poly.transform(train_input)
print(train_poly.shape)
(42, 9)
  • PolynomialFeaures 클래스는 9개의 특성이 어떻게 만들어졌는지 확인하는 아주 좋은 방법을 제공한다.
  • get_feature-names_out() 메서드를 호출하면 9개의 특성이 각각 어떤 입력의 조합으로 만들어졌는지 알려준다.
1
poly.get_feature_names_out()
array(['x0', 'x1', 'x2', 'x0^2', 'x0 x1', 'x0 x2', 'x1^2', 'x1 x2',
       'x2^2'], dtype=object)
  • x0은 첫 번째 특성을 의미하고 x0^2는 첫 번째 특성의 제곱, x0 x1은 첫 번째와 두 번째 특성의 곱을 타나내는 식이다.
  • 이제 테스트 세트를 변환한다.
1
test_poly = poly.transform(test_input)
  • 이어서 변환된 특성을 사용하여 다중 회귀 모델을 훈련한다.

다중 회귀 모델 훈련하기

  • 사이킷런의 LinearRegression 클래스를 임포트하고 앞에서 만든 train_poly를 사용해 모델을 훈련시킨다.
1
2
3
4
from sklearn.linear_model import LinearRegression
lr = LinearRegression()
lr.fit(train_poly, train_target)
print(lr.score(train_poly, train_target))
0.9903183436982124
  • 높은 점수가 나왔다.
  • 농어의 길이뿐만 아니라 높이와 두께를 모두 사용했고 각 특성을 제곱하거나 서로 곱해서 다항 특성을 더 추가했다.
  • 특성이 늘어나면 선형 회귀의 능력이 강해짐을 알 수 있다.
1
print(lr.score(test_poly, test_target))
0.9714559911594134
  • 테스트 셑트에 대한 점수는 높아지지 않았지만 농어의 길이만 사용했을 때 있던 과소적합 문제가 더 이상 나타나지 않게 되었다.
  • 특성을 더 많이 추가하면 어떻게될까? 3제곱, 4제곱 항까지 넣는 것이다.
  • PolynomialFeaures 클래스의 degree 매개변수를 사용하여 필요한 고차항의 최대 차수를 지정할 수 있다.
  • 5제곱까지 특성을 만들어 출력해본다.
1
2
3
4
5
poly = PolynomialFeatures(degree=5, include_bias=False)
poly.fit(train_input)
train_poly = poly.transform(train_input)
test_poly = poly.transform(test_input)
print(train_poly.shape)
(42, 55)
  • 만들어진 특성의 개수가 무려 55개나 된다.
  • train_poly 배열의 열의 개수가 특성의 개수이다.
  • 이 데이터를 사용해 선형 회귀 모델을 다시 훈련한다.
1
2
lr.fit(train_poly, train_target)
print(lr.score(train_poly, train_target))
0.9999999999991097
  • 거의 완벽한 점수다.
  • 테스트 세트에 대한 점수는 어떨까?
1
print(lr.score(test_poly, test_target))
-144.40579242684848
  • 음수가 나왔다.

  • 특성의 개수를 늘리면 선형 모델은 더 강력해진다.

  • 하지만 이런 모델은 훈련 세트에 너무 과대적합되므로 테스트 세트에서는 형편없는 점수를 만든다.

  • 이 문제를 해결하기 위해 2가지 방법이 있다.

    • 방법 1. 다시 특성을 줄인다.
    • 방법 2. 규제를 사용한다.

규제 (regularization)

  • 규제는 머신러닝 모델이 훈련 세트를 너무 과도하게 학습하지 못하도록 훼방하는 것을 말한다.
  • 즉 모델이 훈련 세트에 과대적합되지 않도록 만드는 것이다.
  • 회귀 모델의 경우 특성에 곱해지는 계수(또는 기울기)의 크기를 작게 만드는 일이다.
1
2
3
4
5
6
# 규제하기 전에 먼저 정규화를 진행한다.
from sklearn.preprocessing import StandardScaler # 이 클래스는 변환기의 하나이다.
ss = StandardScaler()
ss.fit(train_poly)
train_scaled = ss.transform(train_poly)
test_scaled = ss.transform(test_poly)
  • StandardScaler 클래스의 객체 ss를 초기화한 후 PolynomialFeatures 클래스로 만든 train_poly를 사용해 이 객체를 훈련한다.
  • 반드시 훈련 세트로 학습한 변환기를 사용해 테스트 세트까지 변환해야 한다.
  • 이제 표준점수로 변환한 train_scaled와 test_scaled가 준비되었다.

릿지(ridge)와 라쏘(lasso)

  • 선형 회귀 모델에 규제를 추가한 모델이다.
  • 두 모델은 규제를 가하는 방법이 다르다.
  • 릿지
    • 계수를 제곱한 값을 기준으로 규제를 적용한다.
  • 라쏘
    • 계수의 절댓값을 기준으로 규제를 적용한다.

릿지 회귀

  • 릿지와 라쏘 모두 sklearn.linear_model 패키지 안에 있다.
  • 모델 객체를 만들고 fit() 메서드에서 훈련한 다음 score()메서드로 평가한다.
  • 앞서 준비한 train_scaled 데이터로 릿지 모델을 훈련한다.
1
2
3
4
from sklearn.linear_model import Ridge
ridge = Ridge()
ridge.fit(train_scaled, train_target)
print(ridge.score(train_scaled, train_target))
0.9896101671037343
  • 선형 회귀에 비해 낮아졌다.
  • 이번에는 테스트 세트에 대한 점수를 확인한다.
1
print(ridge.score(test_scaled, test_target))
0.9790693977615397
  • 확실히 과대적합도지 않아 테스트 세트에서도 좋은 성능을 내고 있다.

  • 릿지와 라쏘 모델을 사용할 때 규제의 양을 임의로 조절할 수 있다.

  • 모델 객체를 만들 때 alpha매개변수로 규제의 강도를 조절한다.

  • alpha 값이 크면 규제 강도가 세지므로 계수 값을 줄이고 더 과소적합되도록 유도한다.

  • aplha 값이 작으면 계수를 줄이는 역할이 줄어들고 선형 회귀 모델과 유사해지므로 과대적합될 가능성이 크다.

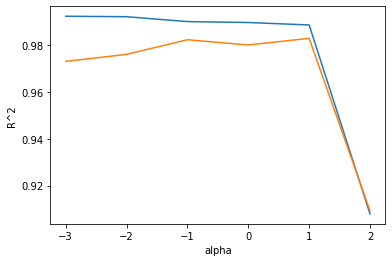
  • 적절한 alpha값을 찾는 한 가지 방법은 alpha값에 R^2값의 그래프를 그려 보는 것이다.

  • 훈련 세트와 테스트 세트의 점수가 가장 가까운 지점이 최적의 alpha 값이 된다.

  • alpha값을 바꿀 때마다 score() 메서드의 결과를 저장할 리스트를 만든다.

1
2
3
import matplotlib.pyplot as plt
train_score = []
test_score = []
  • 다음은 alpha를 0.001에서 100까지 10배씩 늘려가며 릿지 회귀 모델을 훈련한 다음 훈련 세트와 테스트 세트의 점수를 리스트에 저장한다.

  • 사람이 직버 지정해야 하는 매개변수 (하이퍼 파라미터)

  • 다 돌려봐서 성능이 놓은 alpha 값 찾기

  • 경우의 수 (15가지)

    • A 조건 : 5가지
    • B 조건 : 3가지
1
2
3
4
5
6
7
8
9
alpha_list = [0.001, 0.01, 0.1, 1, 10, 100]
for alpha in alpha_list:
# 릿지 모델을 만든다.
ridge = Ridge(alpha=alpha)
# 릿지 모델을 훈련한다.
ridge.fit(train_scaled, train_target)
# 훈련 점수와 테스트 점수를 저장한다.
train_score.append(ridge.score(train_scaled, train_target))
test_score.append(ridge.score(test_scaled, test_target))
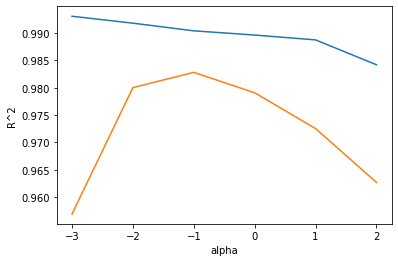
  • 이제 그래프를 그려본다.
  • alpha 값을 10배씩 늘렸기 때문에 그래프 일부가 너무 촘촘해진다.
  • alpha_list에 있는 6개의 값을 동일한 간격으로 나타내기 위해 로그 함수로 바꾸어 지수로 표현한다.
    • 0.001은 -3, 0.01은 -2가 되는 식이다.
1
2
3
4
5
plt.plot(np.log10(alpha_list), train_score)
plt.plot(np.log10(alpha_list), test_score)
plt.xlabel('alpha')
plt.ylabel('R^2')
plt.show()

png

  • 위는 훈련 세트 그래프, 아래는 테스트 세트 그래프이다.

  • 이 그래프 왼쪽에서 두 세트의 점수 차이가 크다.

  • 훈련 세트에만 잘 맞는 과대적합의 전형적인 모습니다.

  • 반대로 오른쪽에서는 두 세트의 점수가 모두 낮아지는 과소적합이 나타난다.

  • 적절한 alpha값은 두 그래프가 가장 가깝고 테스트 세트의 점수가 가장 높은 -1, 즉 10^-1 = 0.1 이다.

  • alpha 값을 0.1로 하여 최종 모델을 훈련한다.

1
2
3
4
ridge = Ridge(alpha=0.1)
ridge.fit(train_scaled, train_target)
print(ridge.score(train_scaled, train_target))
print(ridge.score(test_scaled, test_target))
0.9903815817570366
0.9827976465386926
  • 이 모델은 훈련 세트와 테스트 세트의 점수가 비슷하게 모두 높고 과대적합과 과소적합 사이에서 균형을 맞추고 있다.
  • 이번에는 라쏘 모델을 훈련해보자.

라쏘 회귀

  • 라쏘 모델을 훈련하는 것은 릿지와 매우 비슷하다.
  • Ridge 클래스를 Lasso 클래스로 바꾸는 것이 전부이다.
1
2
3
4
from sklearn.linear_model import Lasso
lasso = Lasso()
lasso.fit(train_scaled, train_target)
print(lasso.score(train_scaled, train_target))
0.989789897208096
  • 라소도 과대적합을 잘 억제한 결과를 보여준다.
  • 테스트 세트의 점수도 확인한다.
1
print(lasso.score(test_scaled, test_target))
0.9800593698421883
  • 릿지만큼 좋은 점수가 나왔다.
  • 앞에서와 같이 alpha값을 바꾸어 가며 훈련 세트와 테스트 세트에 대한 점수를 계산한다.
1
2
3
4
5
6
7
8
9
10
11
train_score = []
test_score = []
alpha_list = [0.001, 0.01, 0.1, 1, 10, 100]
for alpha in alpha_list:
# 라쏘 모델을 만든다.
lasso = Lasso(alpha=alpha, max_iter = 10000) # 반복 횟수를 충분히 늘리기 위해 값을 지정.
# 라쏘 모델을 훈련한다.
lasso.fit(train_scaled, train_target)
# 훈련 점수와 테스트 점수를 저장한다.
train_score.append(lasso.score(train_scaled, train_target))
test_score.append(lasso.score(test_scaled, test_target))
/usr/local/lib/python3.7/dist-packages/sklearn/linear_model/_coordinate_descent.py:648: ConvergenceWarning: Objective did not converge. You might want to increase the number of iterations, check the scale of the features or consider increasing regularisation. Duality gap: 1.878e+04, tolerance: 5.183e+02
  coef_, l1_reg, l2_reg, X, y, max_iter, tol, rng, random, positive
/usr/local/lib/python3.7/dist-packages/sklearn/linear_model/_coordinate_descent.py:648: ConvergenceWarning: Objective did not converge. You might want to increase the number of iterations, check the scale of the features or consider increasing regularisation. Duality gap: 1.297e+04, tolerance: 5.183e+02
  coef_, l1_reg, l2_reg, X, y, max_iter, tol, rng, random, positive
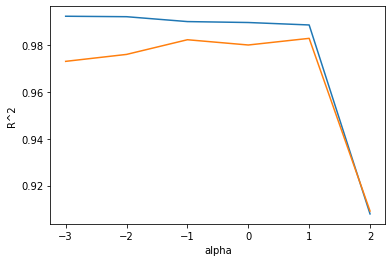
  • train_score와 test_score 리스트를 사용해 그래프를 그린다.
  • 이 그래프도 x축은 로그 스케일로 바꿔 그린다.
1
2
3
4
5
plt.plot(np.log10(alpha_list), train_score)
plt.plot(np.log10(alpha_list), test_score)
plt.xlabel('alpha')
plt.ylabel('R^2')
plt.show()

png

  • 이 그래프도 왼쪽은 과대적합을 부여주고 있고, 오른쪽으로 갈수록 두 세트의 점수가 좁혀지고 있다.
  • 라쏘 모델에서 최적의 alpha값은 1, 즉 10^1 = 10이다.
    • 이 값으로 다시 모델을 훈련한다.
1
2
3
4
lasso = Lasso(alpha=0.1)
lasso.fit(train_scaled, train_target)
print(lasso.score(train_scaled, train_target))
print(lasso.score(test_scaled, test_target))
0.990137631128448
0.9819405116249363


/usr/local/lib/python3.7/dist-packages/sklearn/linear_model/_coordinate_descent.py:648: ConvergenceWarning: Objective did not converge. You might want to increase the number of iterations, check the scale of the features or consider increasing regularisation. Duality gap: 8.062e+02, tolerance: 5.183e+02
  coef_, l1_reg, l2_reg, X, y, max_iter, tol, rng, random, positive
  • 모델이 잘 훈련되었다.
  • 라쏘 모델은 계수 값을 아예 0으로 만들 수 있다.
  • 라쏘 모델의 계수는 coef_ 속성에 저장되어 있다. 이 중에 0인 것을 헤아려본다.
1
print(np.sum(lasso.coef_ == 0))
35
  • 많은 계수가 0이 되었다.
  • 55개의 특성을 모델에 주입했지만 라소 모델이사용한 특성은 15개 밖에 되지 않는다.
  • 이런 특징 때문에 라쏘 모델을 유용한 특성을 골라내는 용도로도 사용할 수 있다.

전체 소스 코드

1
2
3
4
5
6
7
8
9
10
11
12
13
14
15
16
17
18
19
20
21
22
23
24
25
26
27
28
29
30
31
32
33
34
35
36
37
38
39
40
41
42
43
44
45
46
47
48
49
50
51
52
53
54
55
56
57
58
59
60
61
62
63
64
65
66
67
68
69
70
71
72
73
74
75
76
77
78
79
80
81
82
83
84
85
86
87
88
89
90
91
92
93
94
95
96
97
98
99
100
101
102
103
104
105
106
107
108
109
110
111
112
113
114
115
116
117
118
119
120
121
122
123
124
125
126
127
128
129
130
131
132
133
134
135
136
137
138
139
140
141
142
143
144
145
# 특성 공학과 규제

# 데이터 준비
import pandas as pd

df = pd.read_csv('https://bit.ly/perch_csv_data')
perch_full = df.to_numpy()
print(perch_full)

import numpy as np

perch_weight = np.array(
[5.9, 32.0, 40.0, 51.5, 70.0, 100.0, 78.0, 80.0, 85.0, 85.0,
110.0, 115.0, 125.0, 130.0, 120.0, 120.0, 130.0, 135.0, 110.0,
130.0, 150.0, 145.0, 150.0, 170.0, 225.0, 145.0, 188.0, 180.0,
197.0, 218.0, 300.0, 260.0, 265.0, 250.0, 250.0, 300.0, 320.0,
514.0, 556.0, 840.0, 685.0, 700.0, 700.0, 690.0, 900.0, 650.0,
820.0, 850.0, 900.0, 1015.0, 820.0, 1100.0, 1000.0, 1100.0,
1000.0, 1000.0]
)

from sklearn.model_selection import train_test_split

train_input, test_input, train_target, test_target = train_test_split(perch_full, perch_weight, random_state=42)

# 사이킷런의 변환기

from sklearn.preprocessing import PolynomialFeatures

poly = PolynomialFeatures()
poly.fit([[2, 3]])
print(poly.transform([[2, 3]]))

poly = PolynomialFeatures(include_bias=False)
poly.fit([[2, 3]])
print(poly.transform([[2, 3]]))

poly = PolynomialFeatures(include_bias=False)
poly.fit(train_input)
train_poly = poly.transform(train_input)
print(train_poly.shape)

poly.get_feature_names_out()

test_poly = poly.transform(test_input)

# 다중 회귀 모델 훈련하기
from sklearn.linear_model import LinearRegression

lr = LinearRegression()
lr.fit(train_poly, train_target)
print(lr.score(train_poly, train_target))

print(lr.score(test_poly, test_target))

poly = PolynomialFeatures(degree=5, include_bias=False)
poly.fit(train_input)
train_poly = poly.transform(train_input)
test_poly = poly.transform(test_input)
print(train_poly.shape)

lr.fit(train_poly, train_target)
print(lr.score(train_poly, train_target))

print(lr.score(test_poly, test_target))

# 규제

from sklearn.preprocessing import StandardScaler

ss = StandardScaler()
ss.fit(train_poly)
train_scaled = ss.transform(train_poly)
test_scaled = ss.transform(test_poly)

# 릿지 회귀
from sklearn.linear_model import Ridge

ridge = Ridge()
ridge.fit(train_scaled, train_target)
print(ridge.score(train_scaled, train_target))

print(ridge.score(test_scaled, test_target))

import matplotlib.pyplot as plt

train_score = []
test_score = []

alpha_list = [0.001, 0.01, 0.1, 1, 10, 100]
for alpha in alpha_list:
# 릿지 모델을 만듭니다
ridge = Ridge(alpha=alpha)
# 릿지 모델을 훈련합니다
ridge.fit(train_scaled, train_target)
# 훈련 점수와 테스트 점수를 저장합니다
train_score.append(ridge.score(train_scaled, train_target))
test_score.append(ridge.score(test_scaled, test_target))

plt.plot(np.log10(alpha_list), train_score)
plt.plot(np.log10(alpha_list), test_score)
plt.xlabel('alpha')
plt.ylabel('R^2')
plt.show()

ridge = Ridge(alpha=0.1)
ridge.fit(train_scaled, train_target)

print(ridge.score(train_scaled, train_target))
print(ridge.score(test_scaled, test_target))

from sklearn.linear_model import Lasso

lasso = Lasso()
lasso.fit(train_scaled, train_target)
print(lasso.score(train_scaled, train_target))

print(lasso.score(test_scaled, test_target))

train_score = []
test_score = []

alpha_list = [0.001, 0.01, 0.1, 1, 10, 100]
for alpha in alpha_list:
# 라쏘 모델을 만듭니다
lasso = Lasso(alpha=alpha, max_iter=10000)
# 라쏘 모델을 훈련합니다
lasso.fit(train_scaled, train_target)
# 훈련 점수와 테스트 점수를 저장합니다
train_score.append(lasso.score(train_scaled, train_target))
test_score.append(lasso.score(test_scaled, test_target))

plt.plot(np.log10(alpha_list), train_score)
plt.plot(np.log10(alpha_list), test_score)
plt.xlabel('alpha')
plt.ylabel('R^2')
plt.show()

lasso = Lasso(alpha=10)
lasso.fit(train_scaled, train_target)

print(lasso.score(train_scaled, train_target))
print(lasso.score(test_scaled, test_target))

print(np.sum(lasso.coef_ == 0))
[[ 8.4   2.11  1.41]
 [13.7   3.53  2.  ]
 [15.    3.82  2.43]
 [16.2   4.59  2.63]
 [17.4   4.59  2.94]
 [18.    5.22  3.32]
 [18.7   5.2   3.12]
 [19.    5.64  3.05]
 [19.6   5.14  3.04]
 [20.    5.08  2.77]
 [21.    5.69  3.56]
 [21.    5.92  3.31]
 [21.    5.69  3.67]
 [21.3   6.38  3.53]
 [22.    6.11  3.41]
 [22.    5.64  3.52]
 [22.    6.11  3.52]
 [22.    5.88  3.52]
 [22.    5.52  4.  ]
 [22.5   5.86  3.62]
 [22.5   6.79  3.62]
 [22.7   5.95  3.63]
 [23.    5.22  3.63]
 [23.5   6.28  3.72]
 [24.    7.29  3.72]
 [24.    6.38  3.82]
 [24.6   6.73  4.17]
 [25.    6.44  3.68]
 [25.6   6.56  4.24]
 [26.5   7.17  4.14]
 [27.3   8.32  5.14]
 [27.5   7.17  4.34]
 [27.5   7.05  4.34]
 [27.5   7.28  4.57]
 [28.    7.82  4.2 ]
 [28.7   7.59  4.64]
 [30.    7.62  4.77]
 [32.8  10.03  6.02]
 [34.5  10.26  6.39]
 [35.   11.49  7.8 ]
 [36.5  10.88  6.86]
 [36.   10.61  6.74]
 [37.   10.84  6.26]
 [37.   10.57  6.37]
 [39.   11.14  7.49]
 [39.   11.14  6.  ]
 [39.   12.43  7.35]
 [40.   11.93  7.11]
 [40.   11.73  7.22]
 [40.   12.38  7.46]
 [40.   11.14  6.63]
 [42.   12.8   6.87]
 [43.   11.93  7.28]
 [43.   12.51  7.42]
 [43.5  12.6   8.14]
 [44.   12.49  7.6 ]]
[[1. 2. 3. 4. 6. 9.]]
[[2. 3. 4. 6. 9.]]
(42, 9)
0.9903183436982124
0.9714559911594134
(42, 55)
0.9999999999991097
-144.40579242684848
0.9896101671037343
0.9790693977615397

png

0.9903815817570366
0.9827976465386926
0.989789897208096
0.9800593698421883


/usr/local/lib/python3.7/dist-packages/sklearn/linear_model/_coordinate_descent.py:648: ConvergenceWarning: Objective did not converge. You might want to increase the number of iterations, check the scale of the features or consider increasing regularisation. Duality gap: 1.878e+04, tolerance: 5.183e+02
  coef_, l1_reg, l2_reg, X, y, max_iter, tol, rng, random, positive
/usr/local/lib/python3.7/dist-packages/sklearn/linear_model/_coordinate_descent.py:648: ConvergenceWarning: Objective did not converge. You might want to increase the number of iterations, check the scale of the features or consider increasing regularisation. Duality gap: 1.297e+04, tolerance: 5.183e+02
  coef_, l1_reg, l2_reg, X, y, max_iter, tol, rng, random, positive

png

0.9888067471131867
0.9824470598706695
40
  • Reference : 혼자 공부하는 머신러닝 + 딥러닝
chapter3_2

데이터 준비하기

1
2
3
4
5
6
7
8
9
10
11
12
13
14
15
16
17
18
19
import numpy as np

perch_length = np.array(
[8.4, 13.7, 15.0, 16.2, 17.4, 18.0, 18.7, 19.0, 19.6, 20.0,
21.0, 21.0, 21.0, 21.3, 22.0, 22.0, 22.0, 22.0, 22.0, 22.5,
22.5, 22.7, 23.0, 23.5, 24.0, 24.0, 24.6, 25.0, 25.6, 26.5,
27.3, 27.5, 27.5, 27.5, 28.0, 28.7, 30.0, 32.8, 34.5, 35.0,
36.5, 36.0, 37.0, 37.0, 39.0, 39.0, 39.0, 40.0, 40.0, 40.0,
40.0, 42.0, 43.0, 43.0, 43.5, 44.0]
)
perch_weight = np.array(
[5.9, 32.0, 40.0, 51.5, 70.0, 100.0, 78.0, 80.0, 85.0, 85.0,
110.0, 115.0, 125.0, 130.0, 120.0, 120.0, 130.0, 135.0, 110.0,
130.0, 150.0, 145.0, 150.0, 170.0, 225.0, 145.0, 188.0, 180.0,
197.0, 218.0, 300.0, 260.0, 265.0, 250.0, 250.0, 300.0, 320.0,
514.0, 556.0, 840.0, 685.0, 700.0, 700.0, 690.0, 900.0, 650.0,
820.0, 850.0, 900.0, 1015.0, 820.0, 1100.0, 1000.0, 1100.0,
1000.0, 1000.0]
)
  • 훈련 세트와 테스트 세트로 나눈다.
1
2
3
4
5
6
7
from sklearn.model_selection import train_test_split

train_input, test_input, train_target, test_target = train_test_split(
perch_length, perch_weight, random_state = 42
)

train_input.shape, test_input.shape, train_target.shape, test_target.shape
((42,), (14,), (42,), (14,))
  • 훈련 세트와 테스트 세트를 2차원 배열로 변경
1
2
3
4
train_input = train_input.reshape(-1, 1)
test_input = test_input.reshape(-1, 1)

print(train_input.shape, test_input.shape)
(42, 1) (14, 1)

모델 만들기

1
2
3
4
5
6
7
8
9
10
from sklearn.neighbors import KNeighborsRegressor

# knn 클래스 불러오기
knr = KNeighborsRegressor(n_neighbors=3)

# 모형학습
knr.fit(train_input, train_target)

# 테스트 점수 확인하자
#knr.score(test_input, test_target)
KNeighborsRegressor(n_neighbors=3)

예측

  • 혼자 공부하는 머신러닝 + 딥러닝
    • p132
1
2
# 어떤 숫자로 바꿔도 결과는 동일하다
print(knr.predict([[50]]))
[1033.33333333]

시각화

1
2
3
4
5
6
7
8
9
10
11
import matplotlib.pyplot as plt

# 50cm 농어의 이웃을 구하라!
distances, indexes = knr.kneighbors([[50]])

# 훈련 세트의 산점도를 구하라

plt.scatter(train_input, train_target)
plt.scatter(train_input[indexes], train_target[indexes], marker = 'D')
plt.scatter(50, 1033, marker='^')
plt.show()

png

  • [과제] 위 시각화를 객체 지향으로 변경한다!
1
2
3
4
5
6
7
8
9
10
11
12
13
14
15
16
17
18
19
20
21
22
23
24
import matplotlib.pyplot as plt

# 50cm 농어의 이웃을 구하라!
distances, indexes = knr.kneighbors([[50]])

# 훈련 세트의 산점도를 구하라
fig, ax = plt.subplots()
ax.scatter(train_input, train_target)
ax.scatter(train_input[indexes], train_target[indexes], marker = 'D')
ax.scatter(50, 1033, marker='^')
plt.show()

# 아래 코드를 참고함.
"""
import matplotlib.pyplot as plt

# 객체 지향으로 변경
fig, ax = plt.subplots()
ax.scatter(perch_length, perch_weight)
ax.set_xlabel("length")
ax.set_xlabel("weight")

plt.show()
"""

png

'\nimport matplotlib.pyplot as plt\n\n# 객체 지향으로 변경\nfig, ax = plt.subplots()\nax.scatter(perch_length, perch_weight)\nax.set_xlabel("length")\nax.set_xlabel("weight")\n\nplt.show()\n'
  • 머신러닝 모델은 주기적으로 훈련해야 한다. (135p)
    • MLOps (Machine Learning & Operations)
    • 최근에 각광받는 데이터 관련 직업 필수 스킬!
    • 입사와 함께 공부시작 (데이터 분석가, 머신러닝 엔지니어, 데이터 싸이언티스트 희망자)

선형회귀 (머신러닝)

  • 평가지표 확신이 더 중요! R2 점수, MAE, MSE,…
  • 5가지 가정들…
  • 잔차의 정규성
  • 등분산성, 다중공선성, etc…
  • 종속변수 ~ 독립변수간의 “인간관계”를 찾는 과정…
1
2
3
4
5
6
7
8
9
from sklearn.linear_model import LinearRegression

lr = LinearRegression()

# 선형 회귀 모델 훈련
lr.fit(train_input, train_target)

# 50 cm 농어 예측
print(lr.predict([[200]]))
[7094.41034777]
1
2
3
4
plt.scatter(train_input, train_target)
plt.scatter(train_input[indexes], train_target[indexes], marker = 'D')
plt.scatter(200, 7094, marker='^')
plt.show()

png

회귀식을 찾기

  • coef_ : 기울기
  • intercept_ : 상수
1
2
# 기울기,  상수
print(lr.coef_, lr.intercept_)
[39.01714496] -709.0186449535477
  • 기울기 : 계수 = 가중치(딥러닝)
1
2
3
4
5
6
7
8
9
plt.scatter(train_input, train_target)

# 15~50 까지의 1차 방정식 그래프를 그린다.
plt.plot([15, 50],
[15 * lr.coef_ + lr.intercept_,
50 * lr.coef_ + lr.intercept_,
])
plt.scatter(50, 1241.8, marker='^')
plt.show()

png

  • 모형 평가 (138p)
    • 과소 적합이 됨

다항회귀의 필요성

  • 치어를 생각해보자
  • 치어가 1cm
1
print(lr.predict([[1]]))
[-670.00149999]
  • (140p) 1차 방정식을 2차방정식으로 만드는 과정이 나옴
  • 넘파이 브로드캐스팅
    • 배열의 크기가 동일하면 상관 없음
    • 배열의 크기가 다른데, 연산을 할 때, 브로드캐스팅 원리가 적용
    • 브로드캐스팅 튜토리얼, 뭘 찾아서, 추가적 공부를 해야 함(분석가 지망, ai분야 지망)
1
2
3
4
train_poly = np.column_stack((train_input ** 2, train_input))
test_poly = np.column_stack((test_input ** 2, test_input))

print(train_poly.shape, test_poly.shape)
(42, 2) (14, 2)
1
2
3
4
5
lr = LinearRegression()

lr.fit(train_poly, train_target)

print(lr.predict([[50 ** 2, 50]]))
[1573.98423528]
1
2
# 기울기,  상수
print(lr.coef_, lr.intercept_)
[  1.01433211 -21.55792498] 116.0502107827827
  • 이 모델은 다음과 같은 그래프를 학습했다.

    • 무게 = 1.01 x 길이^2 - 21.6 x 길이 + 116.05
  • KNN의 문제점

    • 농어의 길이가 커져도 무게는 동일함 (현실성 제로)
  • 단순 선형회귀(1차 방정식)의 문제점

    • 치어(1cm)의 무게가 음수로 나옴 (현실성 제로)
  • 다항 회귀(2차 방정식)으로 변경

    • 현실성 있음
  • 이런 방정식을 다항싱(polynomial)이라 부르며 다항식을 사용한 선형 외귀를 다항 회귀(polynomial regression)이라 부른다.

  • 이를 이용하여 이전과 동일하게 훈련 세트의 산점도에 그래프로 그려보자.

1
2
3
4
5
6
7
8
9
10
11
12
13
14
# 구간별 직선을 그리기 위해 15 에서 49까지 정수 배열을 만든다.
point = np.arange(15, 50)

# 훈련 세트의 산점도를 그린다.
plt.scatter(train_input, train_target)

# 15에서 49까지 2차 방정식 그래프를 그린다.
plt.plot(point, 1.01*point**2 - 21.6*point + 116.05)

#50cm 농어 데이터
plt.scatter(50, 1574, marker='^')
plt.xlabel('length')
plt.ylabel('weight')
plt.show()

png

  • 앞선 단순 선형 회귀 모델보다 훨씬 나은 그래프가 그려졌다.
  • 이제 훈련 세트와 테스트 세트의 R^2 점수를 평가한다.
1
2
print(lr.score(train_poly, train_target))
print(lr.score(test_poly, test_target))
0.9706807451768623
0.9775935108325122
  • 두 세트의 점수가 높아졌다. 좋은 결과다.
  • 하지만 여전히 테스트 세트의 점수가 조금 더 높다.
  • 과소적합이 아직 남아 있는 듯 하다. 3-3 에서 이를 해결해보자

전체 소스 코드

  • 다음을 참고하라 : bit.ly/hg-03-2
1
2
3
4
5
6
7
8
9
10
11
12
13
14
15
16
17
18
19
20
21
22
23
24
25
26
27
28
29
30
31
32
33
34
35
36
37
38
39
40
41
42
43
44
45
46
47
48
49
50
51
52
53
54
55
56
57
58
59
60
61
62
63
64
65
66
67
68
69
70
71
72
73
74
75
76
77
78
79
80
81
82
83
84
85
86
87
88
89
90
91
92
93
94
95
96
97
98
99
100
101
102
103
104
105
106
107
108
109
110
111
112
113
114
115
116
117
118
import numpy as np

perch_length = np.array(
[8.4, 13.7, 15.0, 16.2, 17.4, 18.0, 18.7, 19.0, 19.6, 20.0,
21.0, 21.0, 21.0, 21.3, 22.0, 22.0, 22.0, 22.0, 22.0, 22.5,
22.5, 22.7, 23.0, 23.5, 24.0, 24.0, 24.6, 25.0, 25.6, 26.5,
27.3, 27.5, 27.5, 27.5, 28.0, 28.7, 30.0, 32.8, 34.5, 35.0,
36.5, 36.0, 37.0, 37.0, 39.0, 39.0, 39.0, 40.0, 40.0, 40.0,
40.0, 42.0, 43.0, 43.0, 43.5, 44.0]
)
perch_weight = np.array(
[5.9, 32.0, 40.0, 51.5, 70.0, 100.0, 78.0, 80.0, 85.0, 85.0,
110.0, 115.0, 125.0, 130.0, 120.0, 120.0, 130.0, 135.0, 110.0,
130.0, 150.0, 145.0, 150.0, 170.0, 225.0, 145.0, 188.0, 180.0,
197.0, 218.0, 300.0, 260.0, 265.0, 250.0, 250.0, 300.0, 320.0,
514.0, 556.0, 840.0, 685.0, 700.0, 700.0, 690.0, 900.0, 650.0,
820.0, 850.0, 900.0, 1015.0, 820.0, 1100.0, 1000.0, 1100.0,
1000.0, 1000.0]
)

from sklearn.model_selection import train_test_split

# 훈련 세트와 테스트 세트로 나눕니다
train_input, test_input, train_target, test_target = train_test_split(
perch_length, perch_weight, random_state=42)
# 훈련 세트와 테스트 세트를 2차원 배열로 바꿉니다
train_input = train_input.reshape(-1, 1)
test_input = test_input.reshape(-1, 1)

from sklearn.neighbors import KNeighborsRegressor

knr = KNeighborsRegressor(n_neighbors=3)
# k-최근접 이웃 회귀 모델을 훈련합니다
knr.fit(train_input, train_target)

print(knr.predict([[50]]))

import matplotlib.pyplot as plt

# 50cm 농어의 이웃을 구합니다
distances, indexes = knr.kneighbors([[50]])

# 훈련 세트의 산점도를 그립니다
plt.scatter(train_input, train_target)
# 훈련 세트 중에서 이웃 샘플만 다시 그립니다
plt.scatter(train_input[indexes], train_target[indexes], marker='D')
# 50cm 농어 데이터
plt.scatter(50, 1033, marker='^')
plt.xlabel('length')
plt.ylabel('weight')
plt.show()

print(np.mean(train_target[indexes]))
print(knr.predict([[100]]))

# 100cm 농어의 이웃을 구합니다
distances, indexes = knr.kneighbors([[100]])

# 훈련 세트의 산점도를 그립니다
plt.scatter(train_input, train_target)
# 훈련 세트 중에서 이웃 샘플만 다시 그립니다
plt.scatter(train_input[indexes], train_target[indexes], marker='D')
# 100cm 농어 데이터
plt.scatter(100, 1033, marker='^')
plt.xlabel('length')
plt.ylabel('weight')
plt.show()

from sklearn.linear_model import LinearRegression

lr = LinearRegression()
# 선형 회귀 모델 훈련
lr.fit(train_input, train_target)

# 50cm 농어에 대한 예측
print(lr.predict([[50]]))

print(lr.coef_, lr.intercept_)

# 훈련 세트의 산점도를 그립니다
plt.scatter(train_input, train_target)
# 15에서 50까지 1차 방정식 그래프를 그립니다
plt.plot([15, 50], [15*lr.coef_+lr.intercept_, 50*lr.coef_+lr.intercept_])
# 50cm 농어 데이터
plt.scatter(50, 1241.8, marker='^')
plt.xlabel('length')
plt.ylabel('weight')
plt.show()

print(lr.score(train_input, train_target))
print(lr.score(test_input, test_target))

train_poly = np.column_stack((train_input ** 2, train_input))
test_poly = np.column_stack((test_input ** 2, test_input))

print(train_poly.shape, test_poly.shape)

lr = LinearRegression()
lr.fit(train_poly, train_target)

print(lr.predict([[50**2, 50]]))

print(lr.coef_, lr.intercept_)

# 구간별 직선을 그리기 위해 15에서 49까지 정수 배열을 만듭니다
point = np.arange(15, 50)
# 훈련 세트의 산점도를 그립니다
plt.scatter(train_input, train_target)
# 15에서 49까지 2차 방정식 그래프를 그립니다
plt.plot(point, 1.01*point**2 - 21.6*point + 116.05)
# 50cm 농어 데이터
plt.scatter([50], [1574], marker='^')
plt.xlabel('length')
plt.ylabel('weight')
plt.show()

print(lr.score(train_poly, train_target))
print(lr.score(test_poly, test_target))
[1033.33333333]

png

1033.3333333333333
[1033.33333333]

png

[1241.83860323]
[39.01714496] -709.0186449535477

png

0.939846333997604
0.8247503123313558
(42, 2) (14, 2)
[1573.98423528]
[  1.01433211 -21.55792498] 116.0502107827827

png

0.9706807451768623
0.9775935108325122
  • Reference : 혼자 공부하는 머신러닝 + 딥러닝

chapter3_1

데이터 준비

1
2
3
4
5
6
7
8
9
10
11
12
13
14
15
16
17
18
19
import numpy as np

perch_length = np.array(
[8.4, 13.7, 15.0, 16.2, 17.4, 18.0, 18.7, 19.0, 19.6, 20.0,
21.0, 21.0, 21.0, 21.3, 22.0, 22.0, 22.0, 22.0, 22.0, 22.5,
22.5, 22.7, 23.0, 23.5, 24.0, 24.0, 24.6, 25.0, 25.6, 26.5,
27.3, 27.5, 27.5, 27.5, 28.0, 28.7, 30.0, 32.8, 34.5, 35.0,
36.5, 36.0, 37.0, 37.0, 39.0, 39.0, 39.0, 40.0, 40.0, 40.0,
40.0, 42.0, 43.0, 43.0, 43.5, 44.0]
)
perch_weight = np.array(
[5.9, 32.0, 40.0, 51.5, 70.0, 100.0, 78.0, 80.0, 85.0, 85.0,
110.0, 115.0, 125.0, 130.0, 120.0, 120.0, 130.0, 135.0, 110.0,
130.0, 150.0, 145.0, 150.0, 170.0, 225.0, 145.0, 188.0, 180.0,
197.0, 218.0, 300.0, 260.0, 265.0, 250.0, 250.0, 300.0, 320.0,
514.0, 556.0, 840.0, 685.0, 700.0, 700.0, 690.0, 900.0, 650.0,
820.0, 850.0, 900.0, 1015.0, 820.0, 1100.0, 1000.0, 1100.0,
1000.0, 1000.0]
)

k-최근점 이웃 회귀(Regression)

  • 중요도 : 하 (그냥 넘어가세요!)
    • 실무에서 잘 안쓰이고, 시간은 한정되어 있기 때문

시각화

  • 다음과 같이 fig, ax를 이용해 객체 지향으로 작성하라
1
2
3
4
5
6
7
8
9
import matplotlib.pyplot as plt

# 객체 지향으로 변경
fig, ax = plt.subplots()
ax.scatter(perch_length, perch_weight)
ax.set_xlabel("length")
ax.set_xlabel("weight")

plt.show()

png

훈련데이터 테스트데이터셋 분리

  • 외워야 할 정도로 중요하다.
1
2
3
4
5
6
from sklearn.model_selection import train_test_split
train_input, test_input, train_target, test_target = train_test_split( # 자체적으로 셔플이 된다.
perch_length, perch_weight, random_state = 42
)

train_input.shape, test_input.shape, train_target.shape, test_target.shape
((42,), (14,), (42,), (14,))
  • reshape() 사용하여 2차원 배열로 바꿈
1
2
3
4
train_input = train_input.reshape(-1, 1)
test_input = test_input.reshape(-1, 1)

print(train_input.shape, test_input.shape)
(42, 1) (14, 1)

결정계수

  • 모델이 얼마만큼 정확하냐?
1
2
3
4
5
6
7
8
9
10
from sklearn.neighbors import KNeighborsRegressor

# knn 클래스 불러오기
knr = KNeighborsRegressor()

# 모형학습
knr.fit(train_input, train_target)

# 테스트 점수 확인하자
knr.score(test_input, test_target)
0.992809406101064

MAE

  • 타깃과 예측의 절댓값 오차를 평균하여 반환
1
2
3
4
5
from sklearn.metrics import mean_absolute_error

# 예측 데이터 만들기
test_prediction = knr.predict(test_input)
test_prediction
array([  60. ,   79.6,  248. ,  122. ,  136. ,  847. ,  311.4,  183.4,
        847. ,  113. , 1010. ,   60. ,  248. ,  248. ])
  • mae를 구한다.
  • mae = mean_absolute_error
    • 평균적 오차를 구하는 것이다.
1
2
mae = mean_absolute_error(test_target, test_prediction)
print(mae)
  • 평균적으로 19g정도 다르다.

과대적합 vs 과소적합

  • 공통점은 머신러닝 모형이 실제 테스트 시 잘 예측을 못함!
  • 과대적합 : 훈련데이터에는 예측 잘함 / 테스트 데이터에서는 예측을 잘 못함
    • 처리하기 곤란
  • 과소적합 : 훈련데이터에서는 예측을 못하고, 테스트데이터에서는 예측을 잘 함 or 둘다 예측을 잘 못함.
    • 데이터의 양이 적거나, 모델을 너무 간단하게 만듬!
1
2
# 훈련 데이터 점수 확인하자.
knr.score(train_input, train_target)
0.9698823289099254
  • 0.97 정도 나옴
1
2
3
4
5
6
7
# Defult 5를 3으로 변경
# 머신러닝 모형을 살짝 변경
knr.n_neighbors = 3

# 모델을 다시 훈련
knr.fit(train_input, train_target)
print(knr.score(train_input, train_target))
0.9804899950518966
  • 훈련데이터로 검증 0.98
1
print(knr.score(test_input, test_target))
0.9746459963987609
  • mae 구하기
    • 평균적 오차 구하기
1
2
3
test_prediction = knr.predict(test_input)
mae = mean_absolute_error(test_target, test_prediction)
print(mae)
35.42380952380951
  • 평균적으로 35.4g 다름

결론

  • k 그룹을 5로 했을 때, R2 점수는 0.98, MAE는 19 였음

  • k 그룹을 3로 했을 때, R2 점수는 0.97, MAE는 35 였음

  • k 그룹을 7로 했을 때, R2 점수는 0.97, MAE는 32 였음

  • Reference : 혼자 공부하는 머신러닝 + 딥러닝